All the songs I recorded, I followed some common practices amongst all of them and some unique ones. Common practices are needed because as a Mixing Engineer, I have some preferred workflows, and unique practices are necessary because every song is a new world of its own. This blog shares the common things and the new ones.
The Foundation: Common Techniques Across All Mixes
My overarching mixing philosophy is simple: cleanup before color. If you don't remove the mud, manage the harsh highs, and clear the crowded lower-mids first, adding saturation, distortion, and character will only amplify the mess. Cleanup allows the mix to breathe, paving the way for the creative "dirtiness" that gives a track its vibe.
Here are the staple techniques and signal chains I used across almost all the tracks:
1. Acoustic Guitar Bus EQ
Regardless of the microphone array or technique used during tracking, my acoustic guitar bus almost always receives a foundational EQ curve. I apply a low-cut shelf to remove the low-end rumble below 100Hz. This eliminates proximity effect boominess and clears vital space for the kick and bass. I then apply a high-shelf boost at around 5.7kHz (Huff, no date). This specific frequency highlights the percussive attack of the pick and the natural "air" of the strings, ensuring the acoustic cuts through a dense mix without sounding brittle (McAllister, 2023). I don’t always do this using a parametric EQ. Sometimes I like to use a Pultec Style EQ.
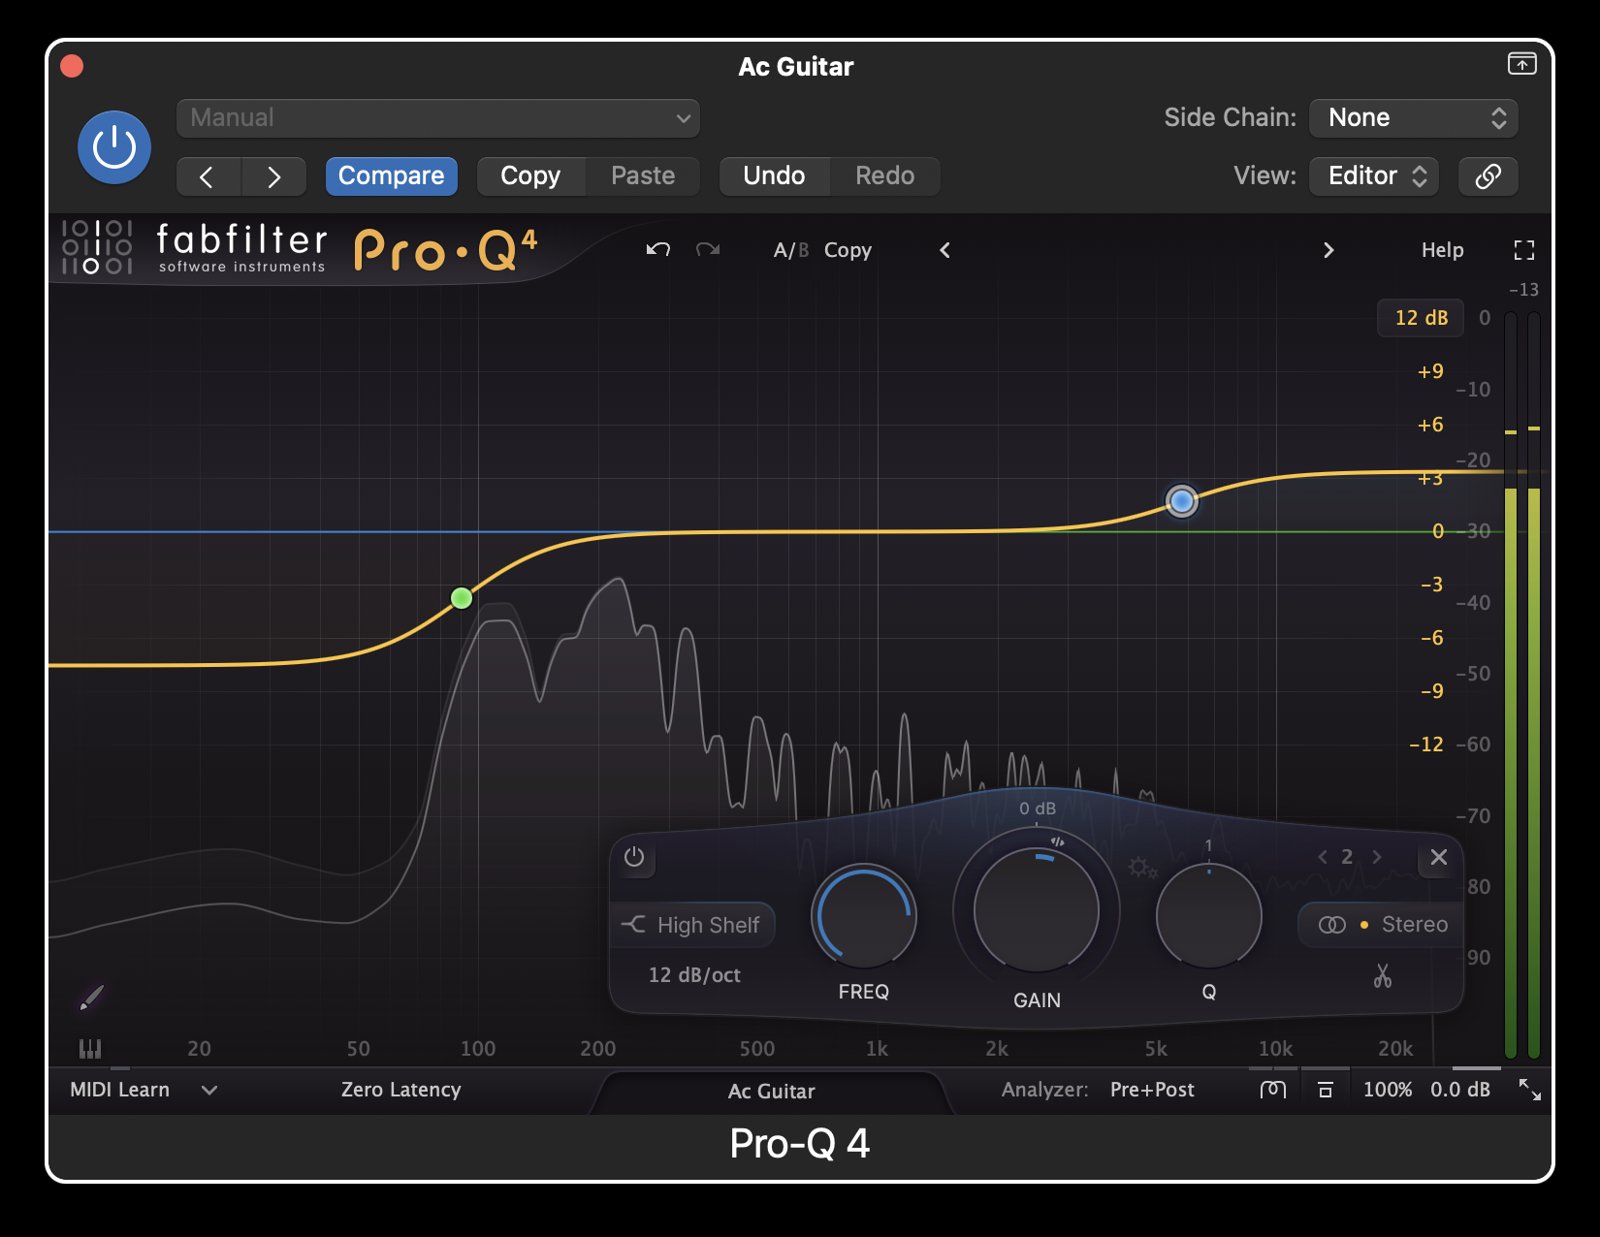
Fig 1: Parametric EQ curve on the acoustic guitar bus
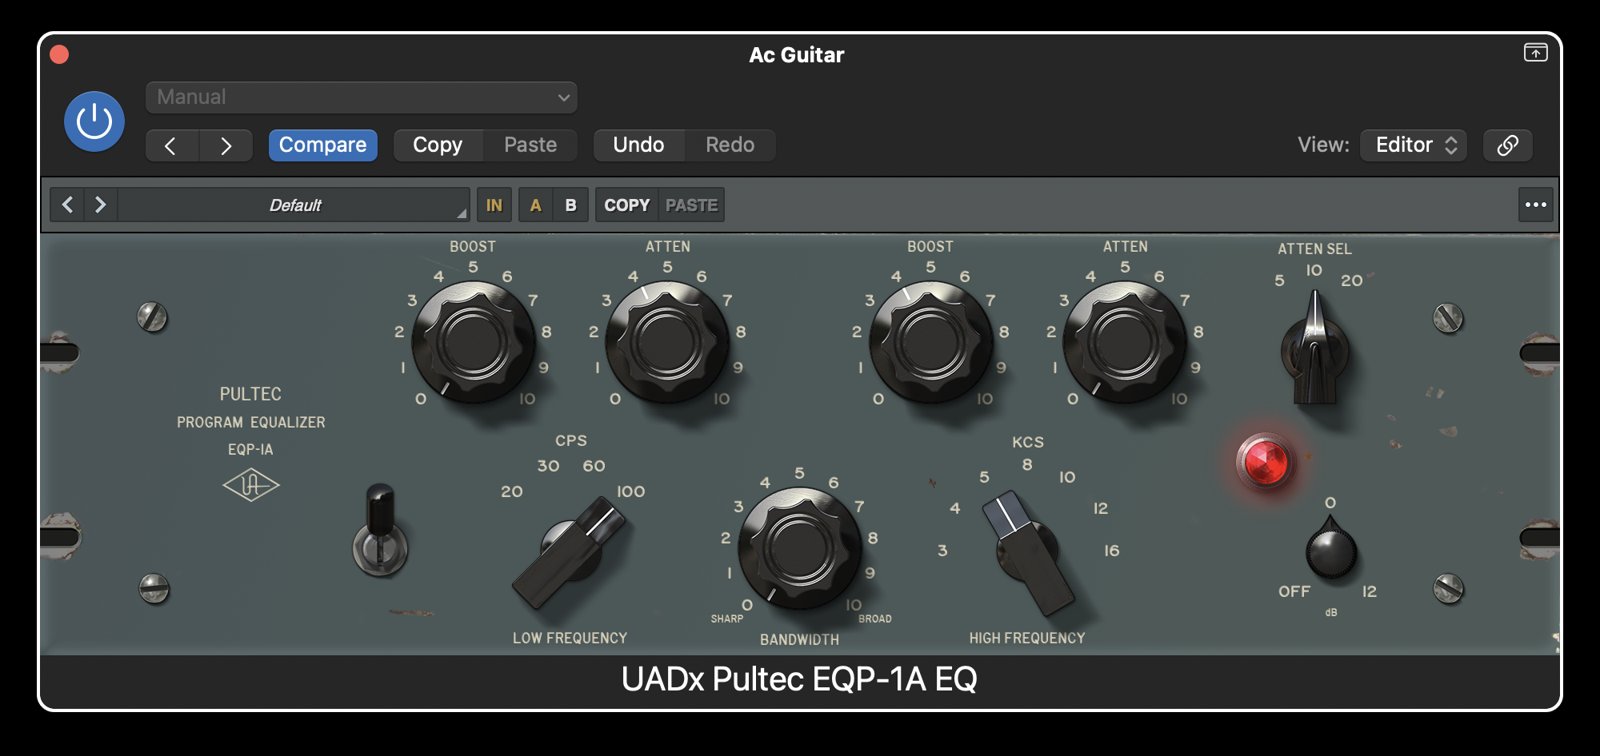
Fig 2: Pultec Style EQ on the acoustic guitar bus
2. The Kick/Snare Anchor (Drum Gain Staging)
Before I even touch a fader to begin gain staging, I instill strict organizational discipline by grouping related microphones into dedicated track stacks. I immediately pair the Kick In and Out, Snare Top and Bottom, Overheads Left and Right, and Room Left and Right into their own respective sub-groups (Rogers, 2023). This discipline instantly sorts out a dense session and makes all subsequent editing and bus processing significantly easier.
Once the tracks are grouped, I build the entire kit around the relationship between the kick and the snare. These two elements form the rhythmic anchor of modern music. I focus intensely on their gain staging first, getting them to punch at the exact right levels. Only after I find a perfect, driving balance between the kick and snare do I bring up the overheads/Glyn Johns mics, hi-hats, toms, rooms, hall, Wurst, etc. to expand the stereo image (Avid, 2024). All of these are the colours added to the palette. Once the center is anchored, the rest of the kit naturally falls into place.
3. Dynamic Masking: Sidechaining for Vocal Clarity
Vocal clarity is non-negotiable. If a recording is highly transient-heavy (sharp snare cracks or aggressive cymbal hits), it can easily mask the lead vocal. To combat this, I frequently employ sidechain compression on the necessary tracks, using the main lead vocal as the trigger. For example, this means that every time the vocalist sings, the snare bus dips (ducks) by just 1 or 2 dB. It is entirely transparent to the listener, but it guarantees the vocal always remains front-and-center.
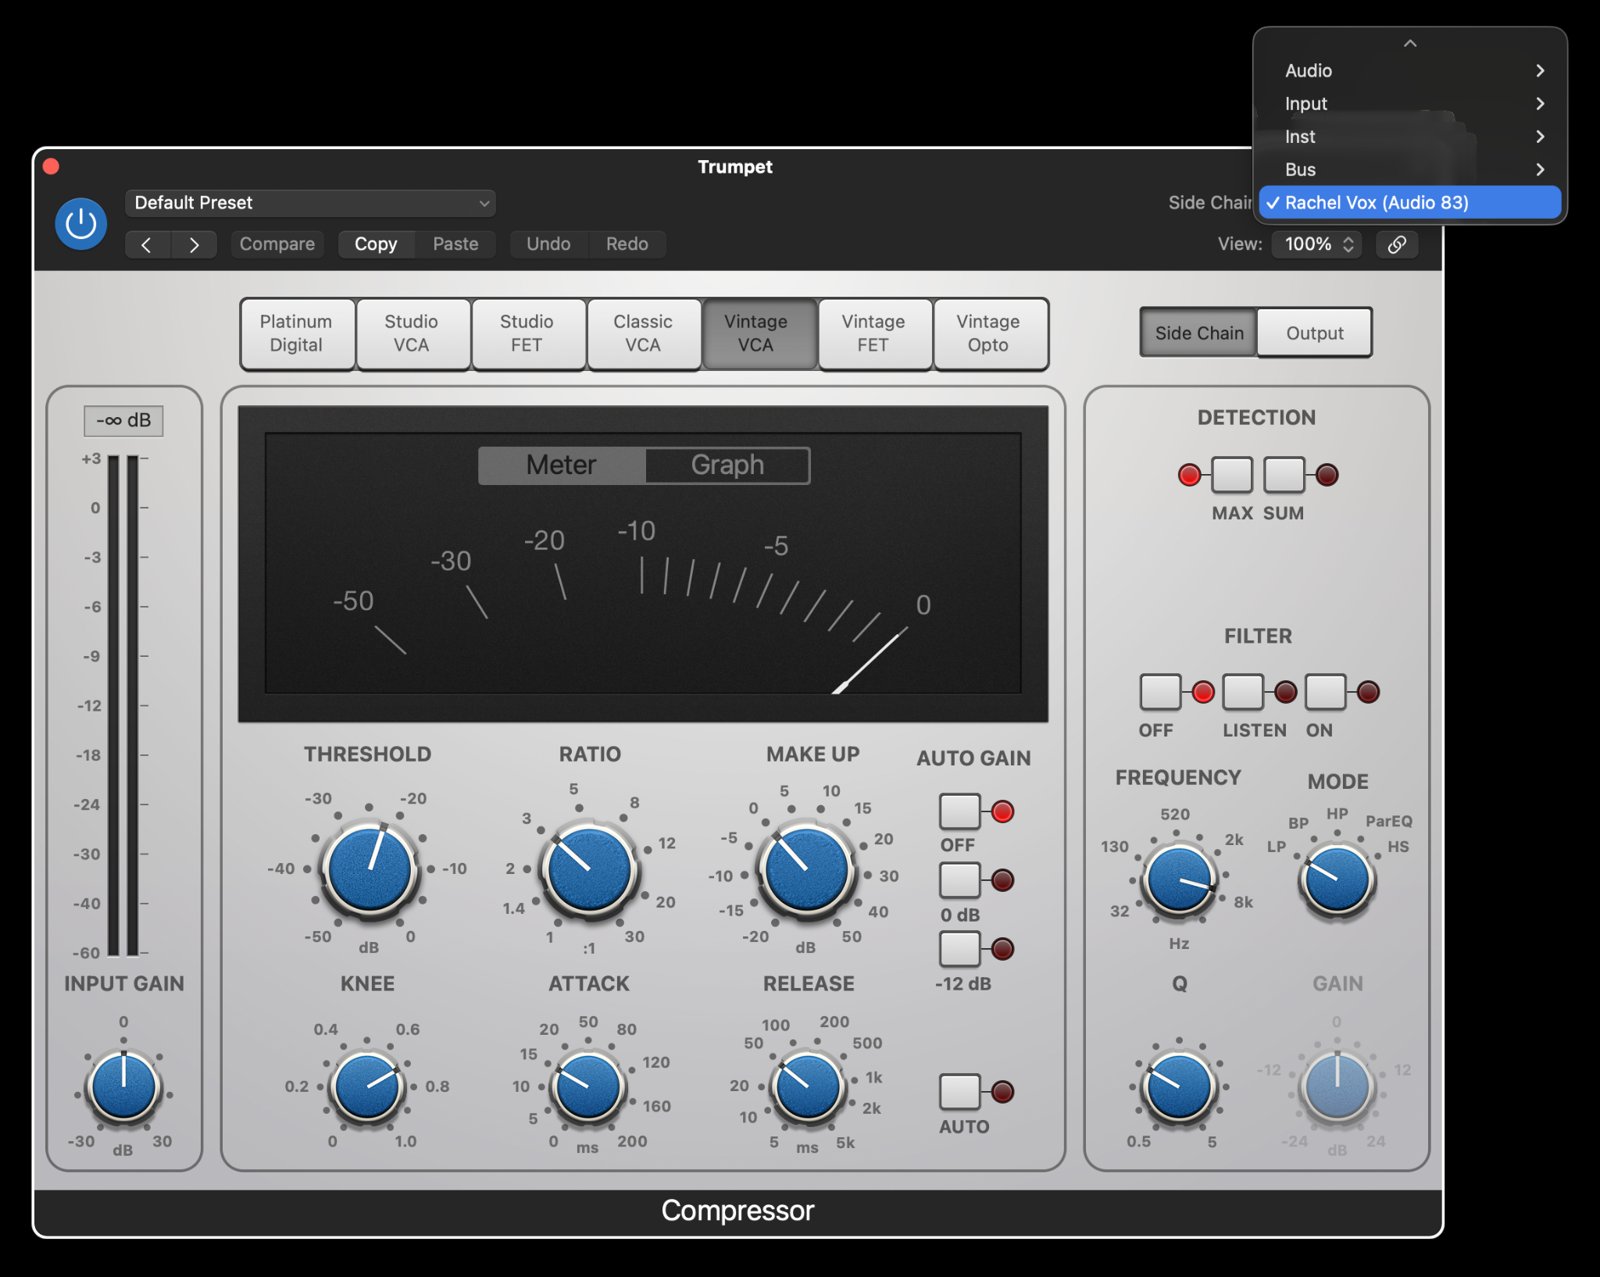
Fig 3: Sidechain compression on the snare bus triggered by the lead vocal
I apply this exact same dynamic masking technique to my vocal reverb and delay buses. By sidechaining the spatial effects against the lead vocal, the reverb actively ducks out of the way while the artist is singing, keeping the lyrics crisp, dry, and intelligible. Then, the moment there is a pause in the vocal phrase, the compression releases, allowing the lush reverb tails to swell back up and beautifully fill the empty space in the arrangement (Sage Audio, no date).

Fig 4: Sidechain compression on the reverb and delay buses triggered by the lead vocal
4. Psychoacoustic Lifts: Bass Automation
A chorus needs to "lift." One of my favorites, the trick I use to achieve this across almost all my mixes is automating the bass guitar. The main goal here is to provide a subtle boost to the low-end so as to give the chorus much more depth (Produce Like A Pro, 2022). By pushing the bass up by just 1 to 1.5 dB the chorus hits with a deep physical impact that makes the entire arrangement feel larger and wider.

Fig 5: Bass guitar volume automation in the chorus
5. Vocal Treatment and Pitch Healing
During tracking, my focus is always on capturing the perfect emotional take. Because of this, I rely on Melodyne during the mixing phase to do what I call "pitch healing." I don't aggressively tune vocals to the grid (Samama, 2016). Instead, I bring the pitch slightly closer to the center, tame minor pitch drifts, and subtly modulate vibratos to keep the notes in range while perfectly preserving the raw emotion of the performance.
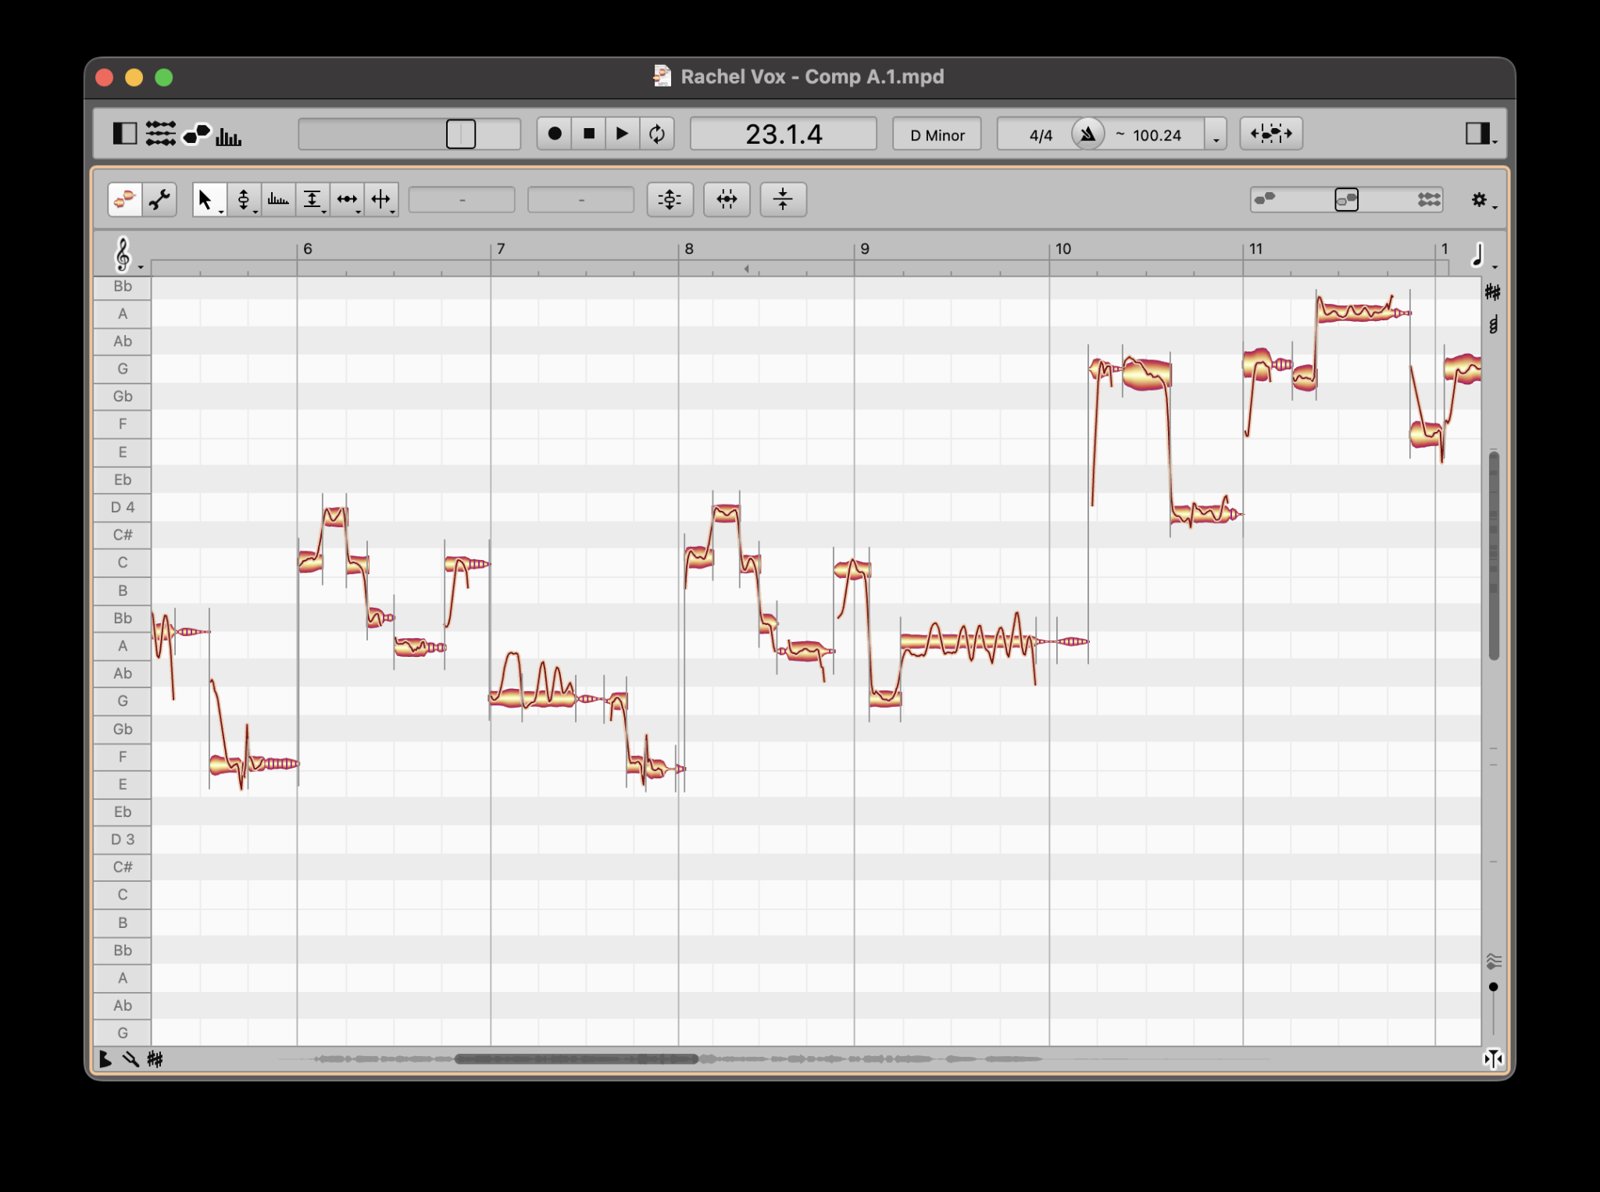
Fig 6: Pitch healing on the vocal track using Melodyne
Additionally I relied on the iZotope RX De-plosive plugin at the very beginning of the vocal signal chains (specifically on Rachel and Emma’s tracks) to clean up low-end thumps (Martinovich, 2022).
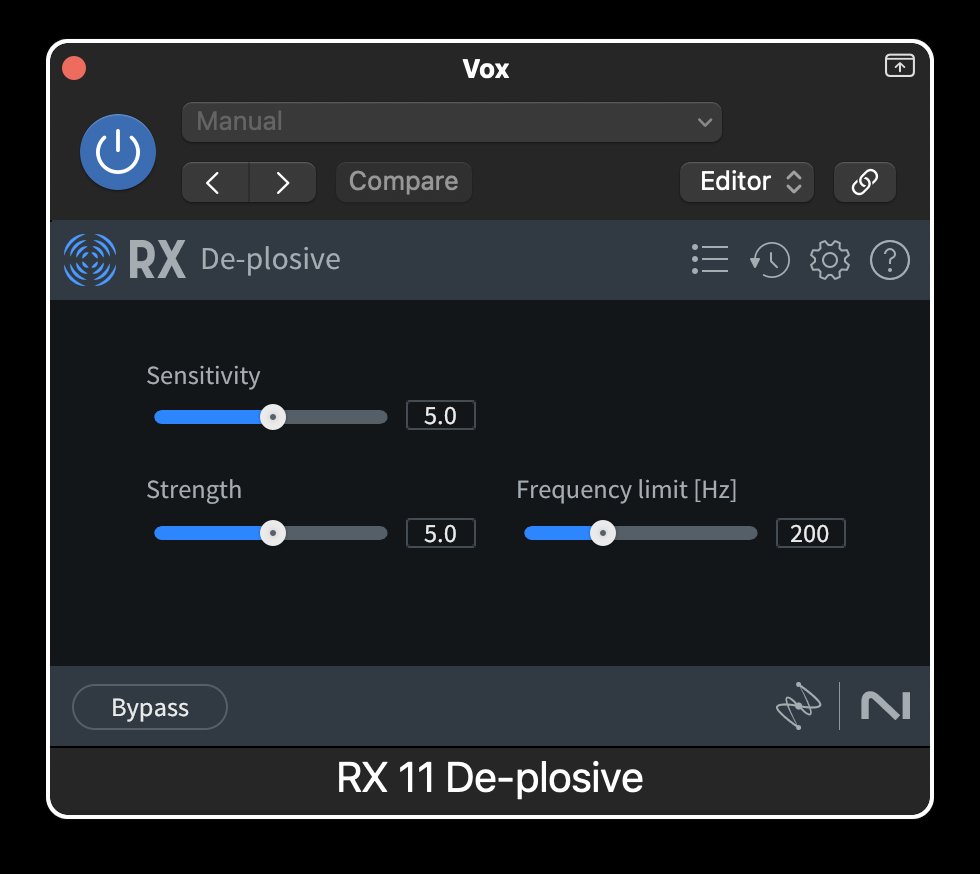
Fig 7: iZotope RX De-plosive plugin at the beginning of the vocal signal chain
This was always followed by careful De-Essing to keep the high-end smooth and pleasant (Tignor, 2026).
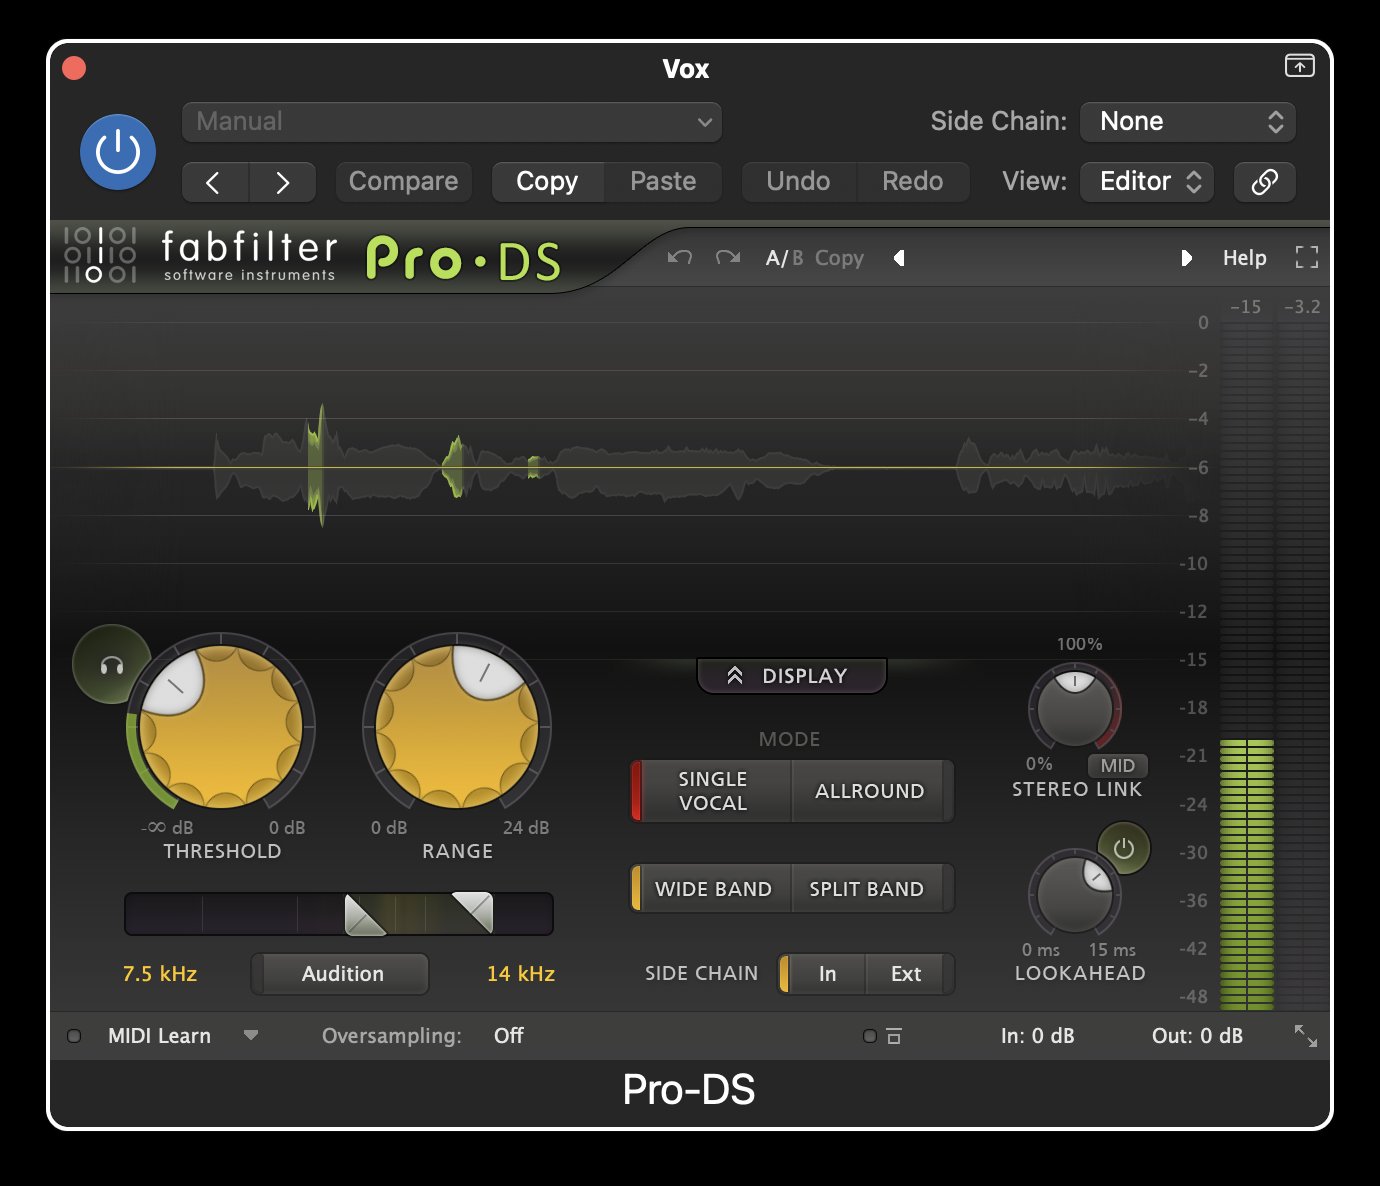
Fig 8: De-Esser applied to the vocal track to smooth the high-end
6. Grouping, Routing, and Track Stacks (Mix Bus)
Whether I am using Logic Pro (Track Stacks) or Pro Tools (Folders), my routing structure is highly organized. Guitars recorded with multiple microphones are immediately grouped into a stack, allowing me to do minimal processing on the individual mics and broader tonal shaping on the group bus (Stewart, 2021).
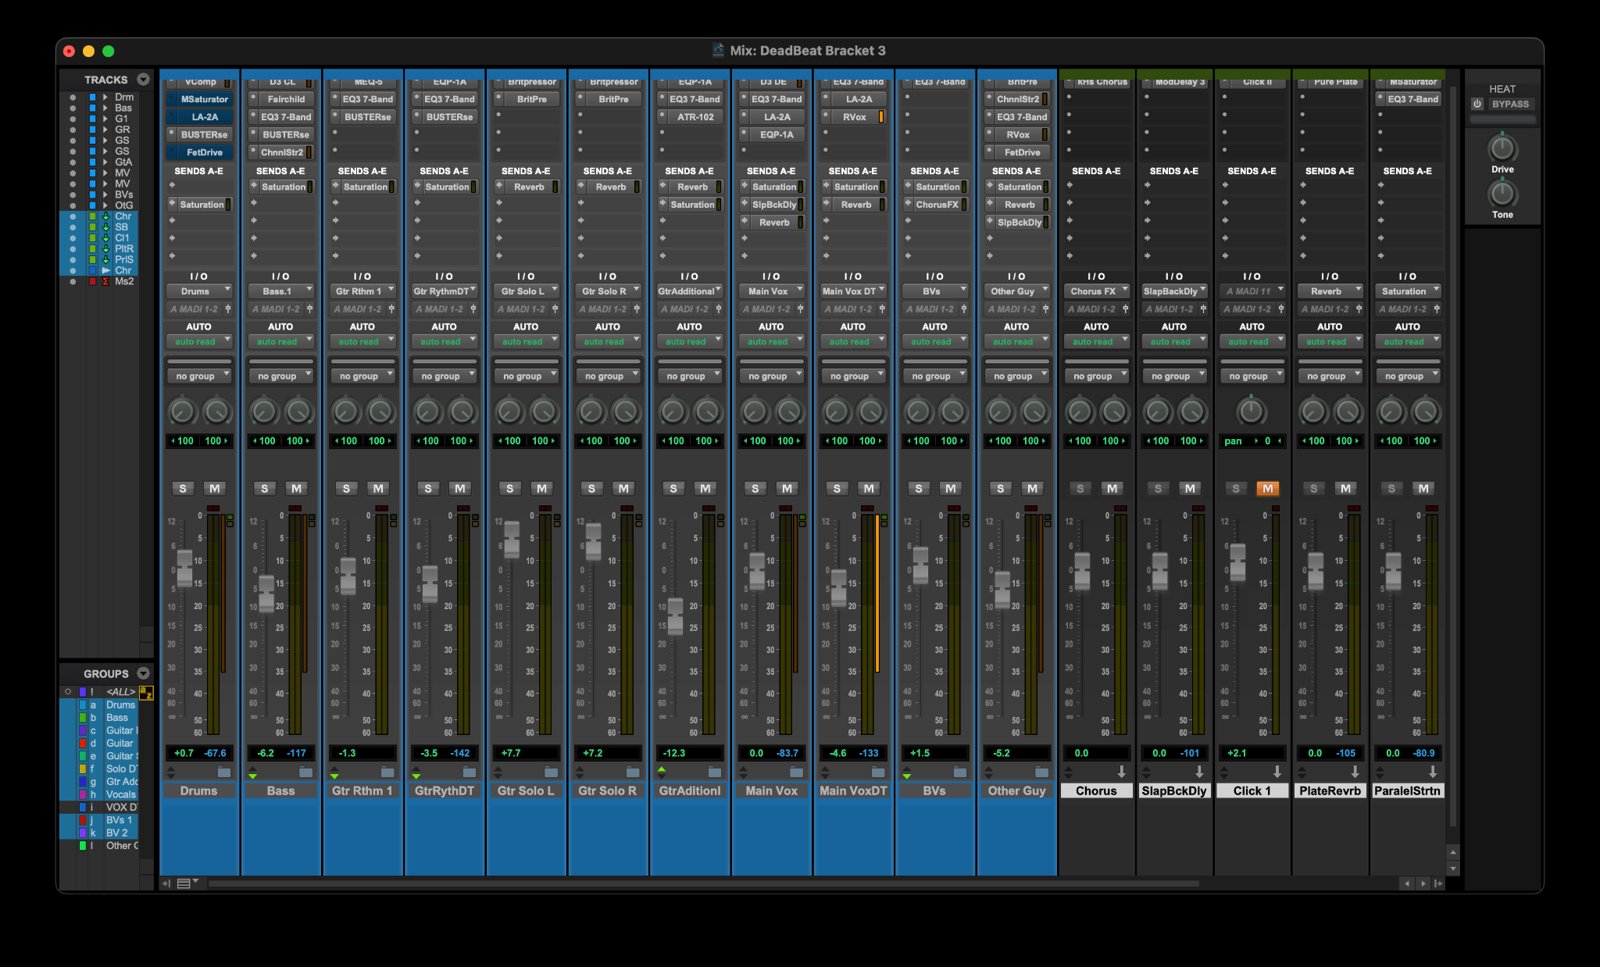
Fig 9: Multiple folders in Pro Tools
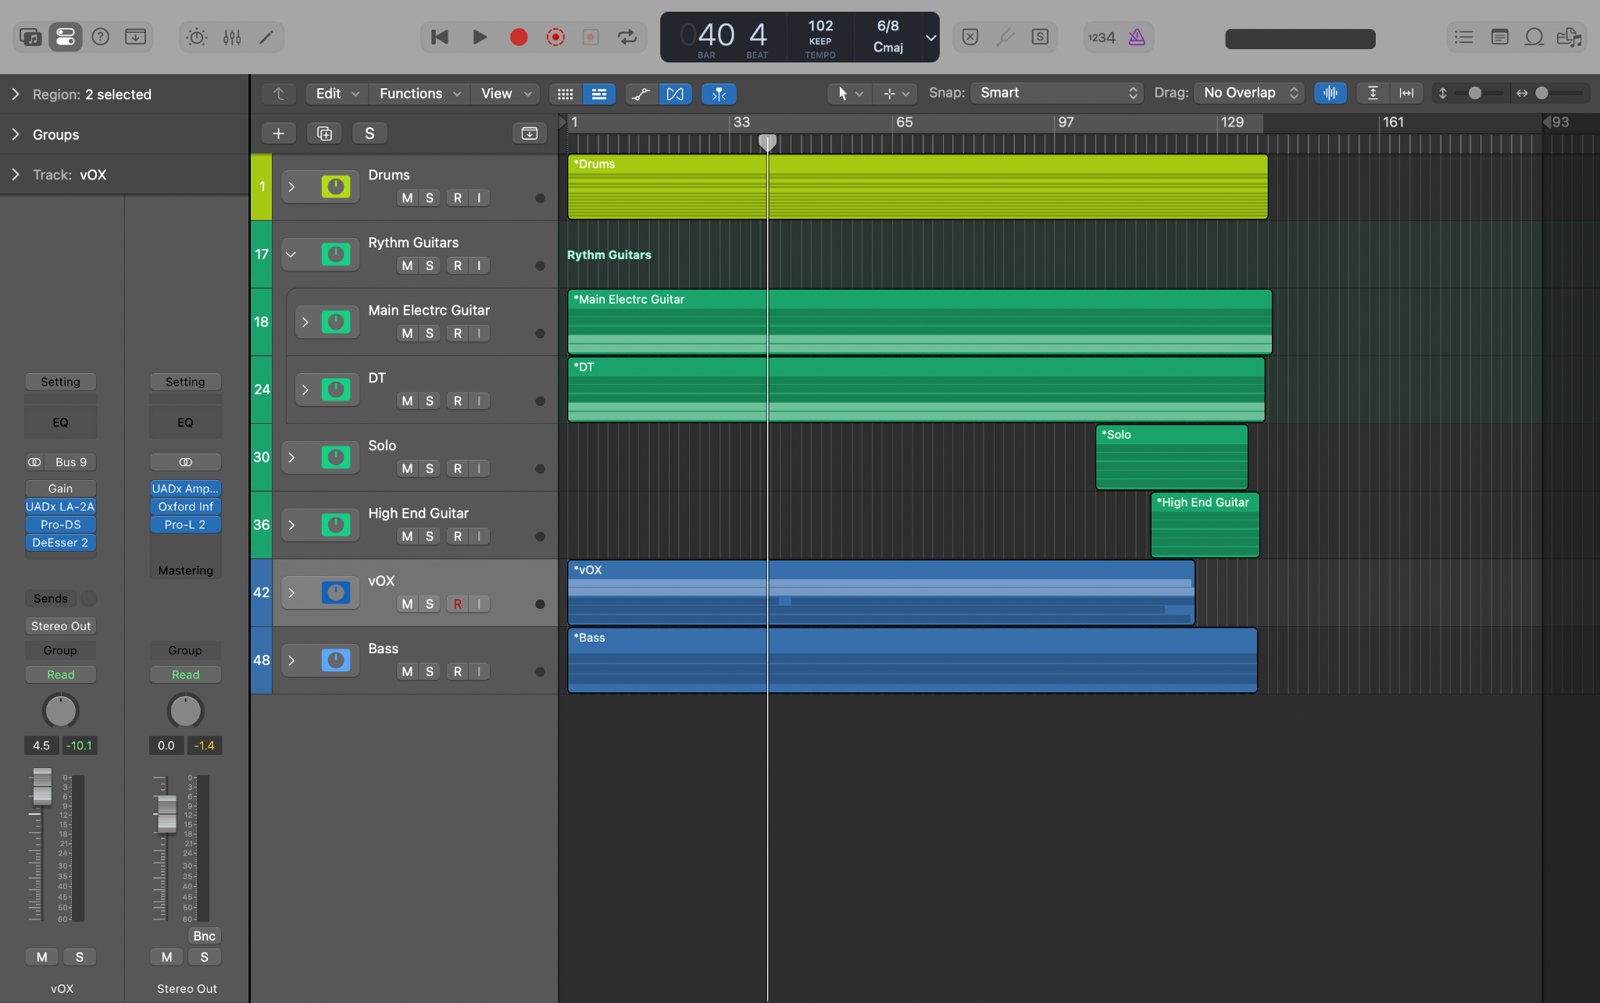
Fig 10: Multiple Stacks in Logic
This is especially true for drums recorded using the Glyn Johns technique. On every mix featuring Glyn Johns drums, I route the overheads into their own sub-stack inside the main drum bus. A staple move on this overhead stack is adding a high-shelf EQ boost at around 2700 Hz to introduce sheen, air, and clarity to the cymbals and the room.
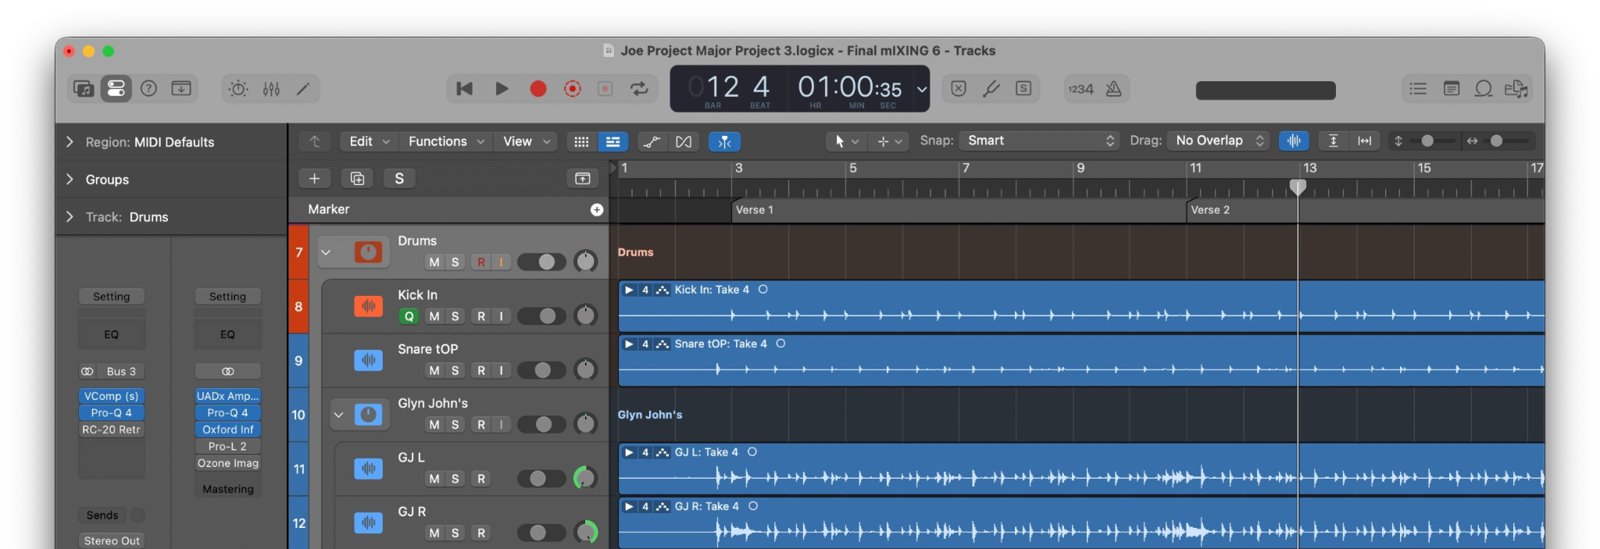
Fig 11: Glyn Johns overheads routed into a dedicated sub-stack inside the main drum bus
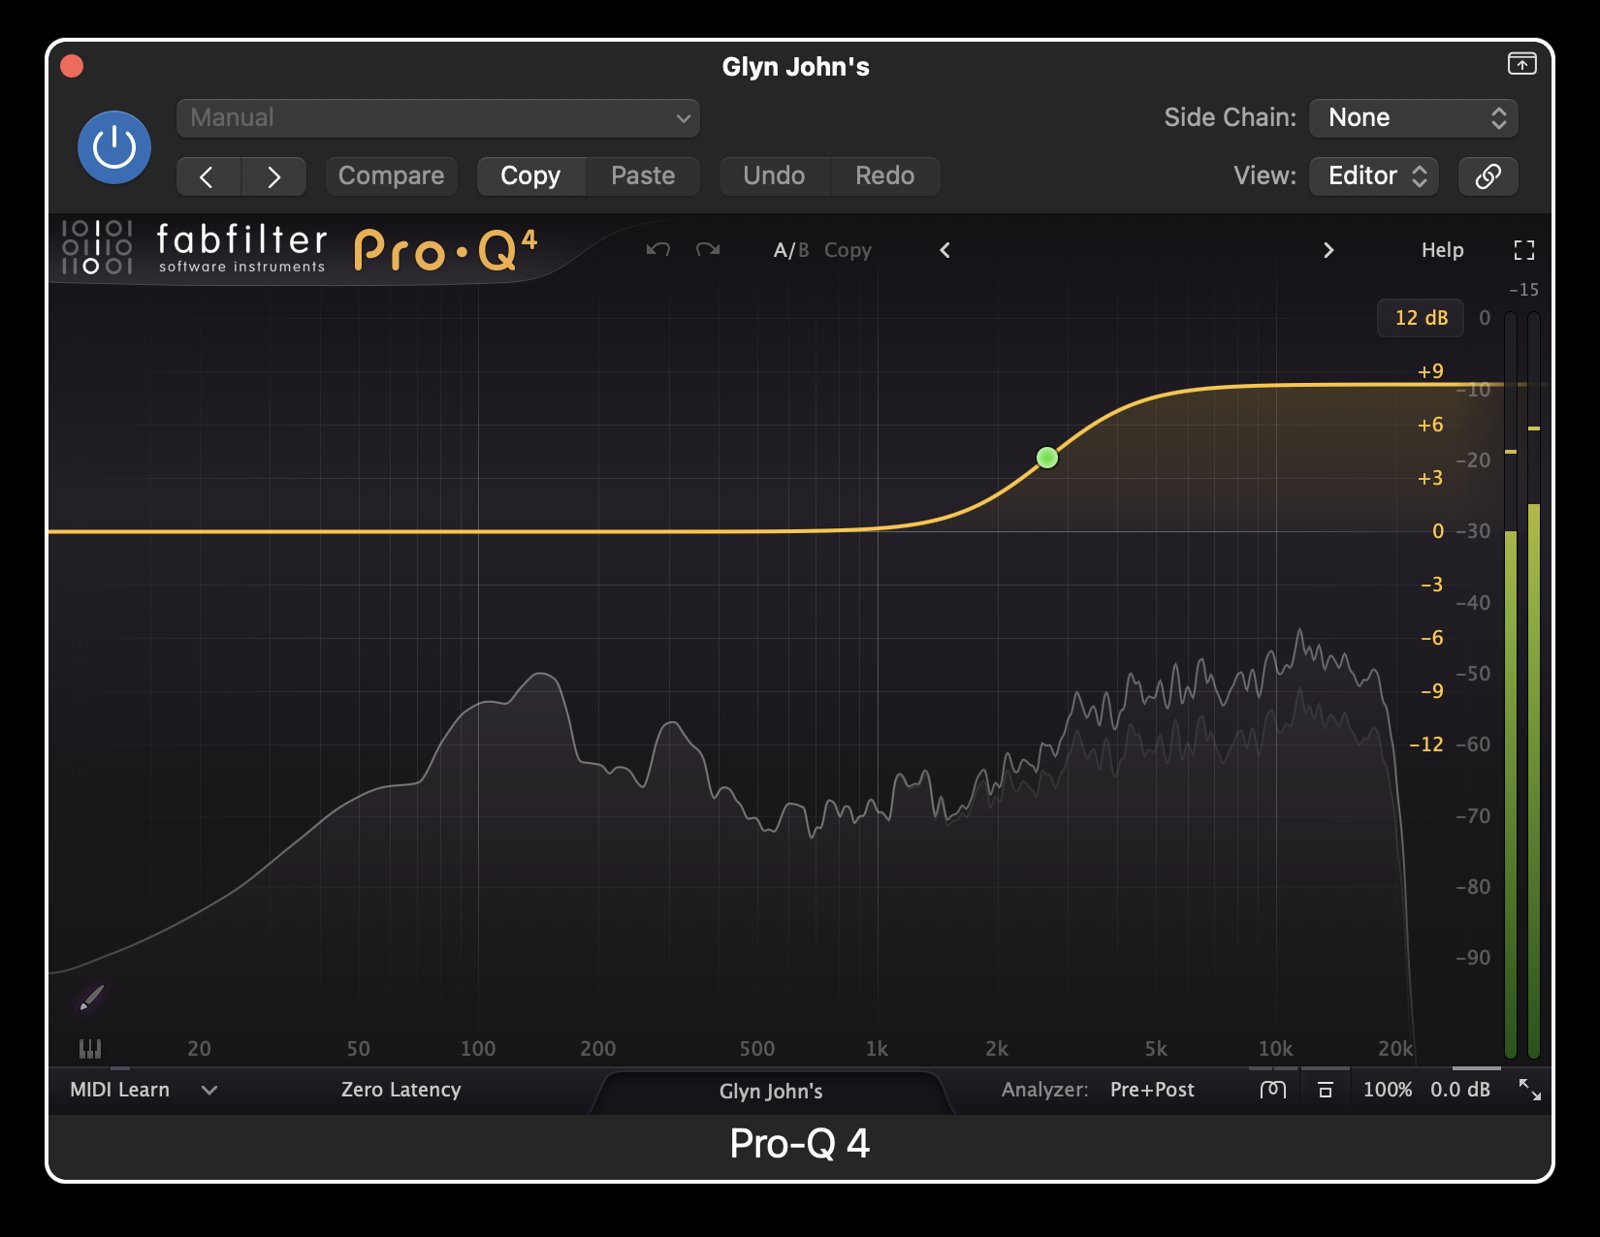
Fig 12: High-shelf EQ boost at 2700 Hz on the overhead stack
7. Depth, Space, and Parallel Processing
I rely heavily on aux tracks for spatial effects and parallel processing (Bigwood, 2011):
- Reverbs & Delays: My go-to sends include Valhalla Room (for long spatial decays),
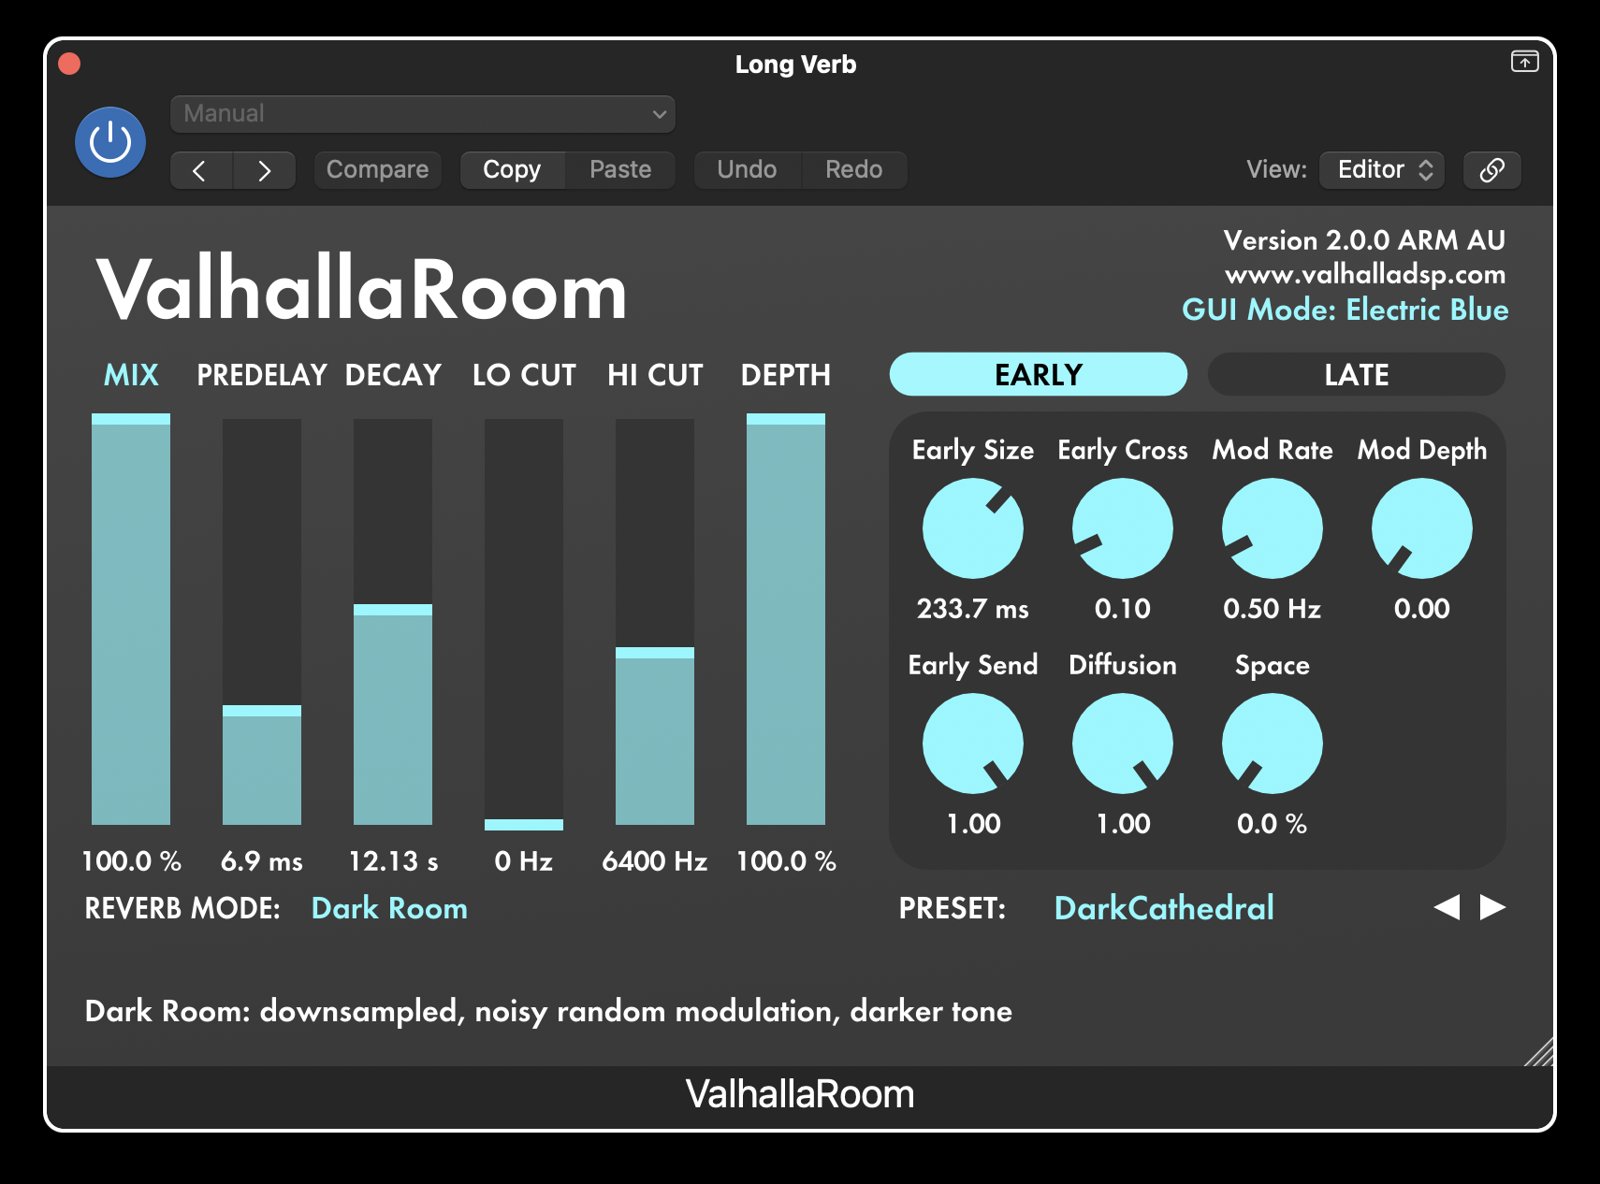
Fig 13: Valhalla Room aux send for long spatial decays
UAD Pure Plate (the most dependable plate reverb I've ever heard),
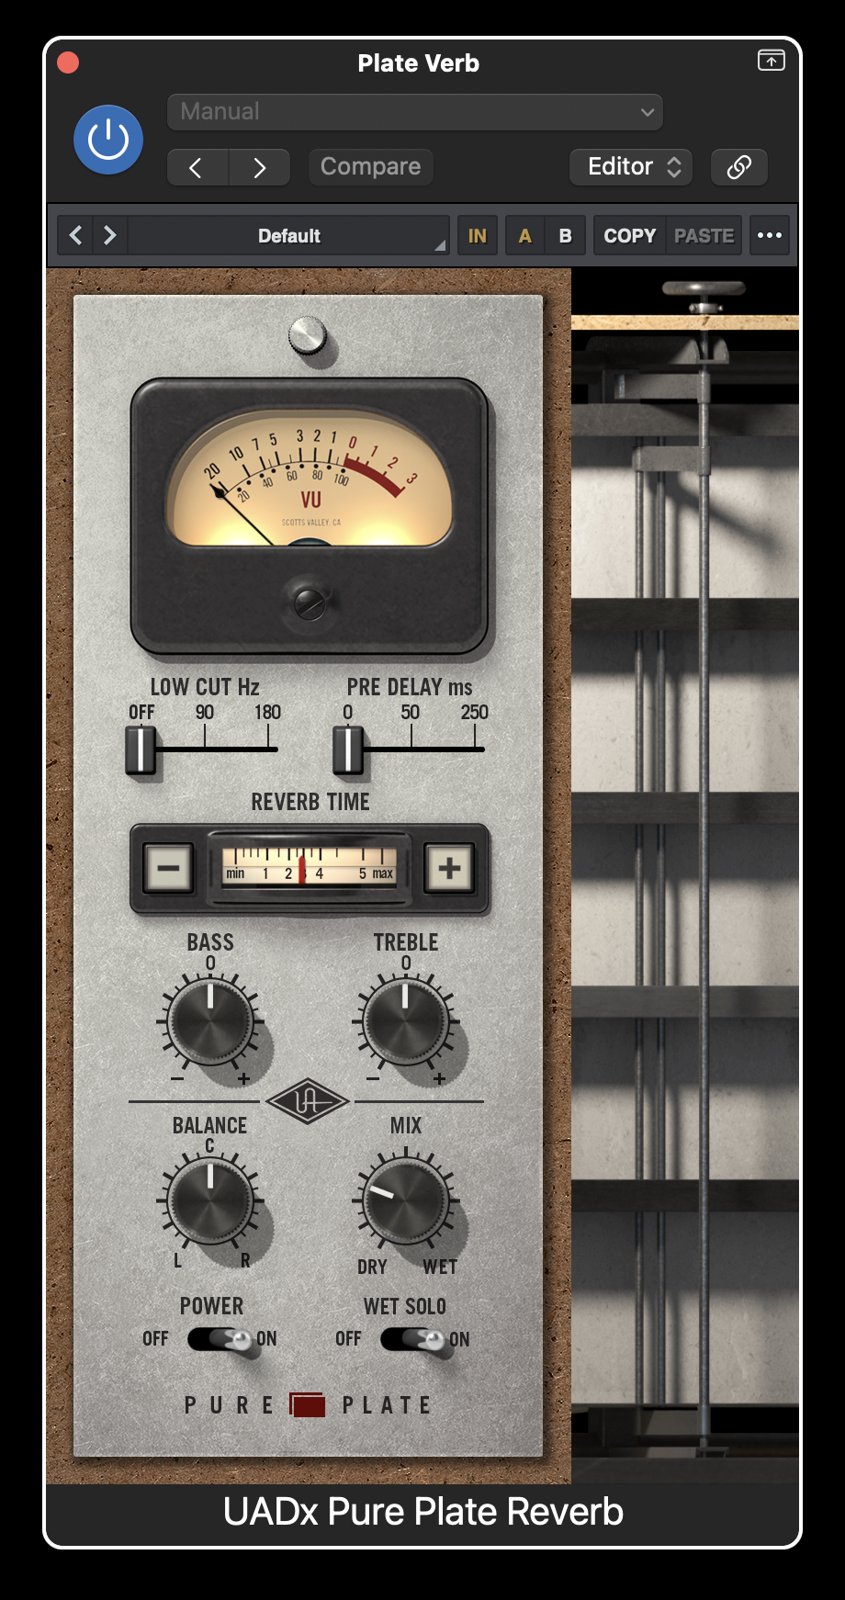
Fig 14: UAD Pure Plate reverb aux send
and Logic’s Tape Delay.
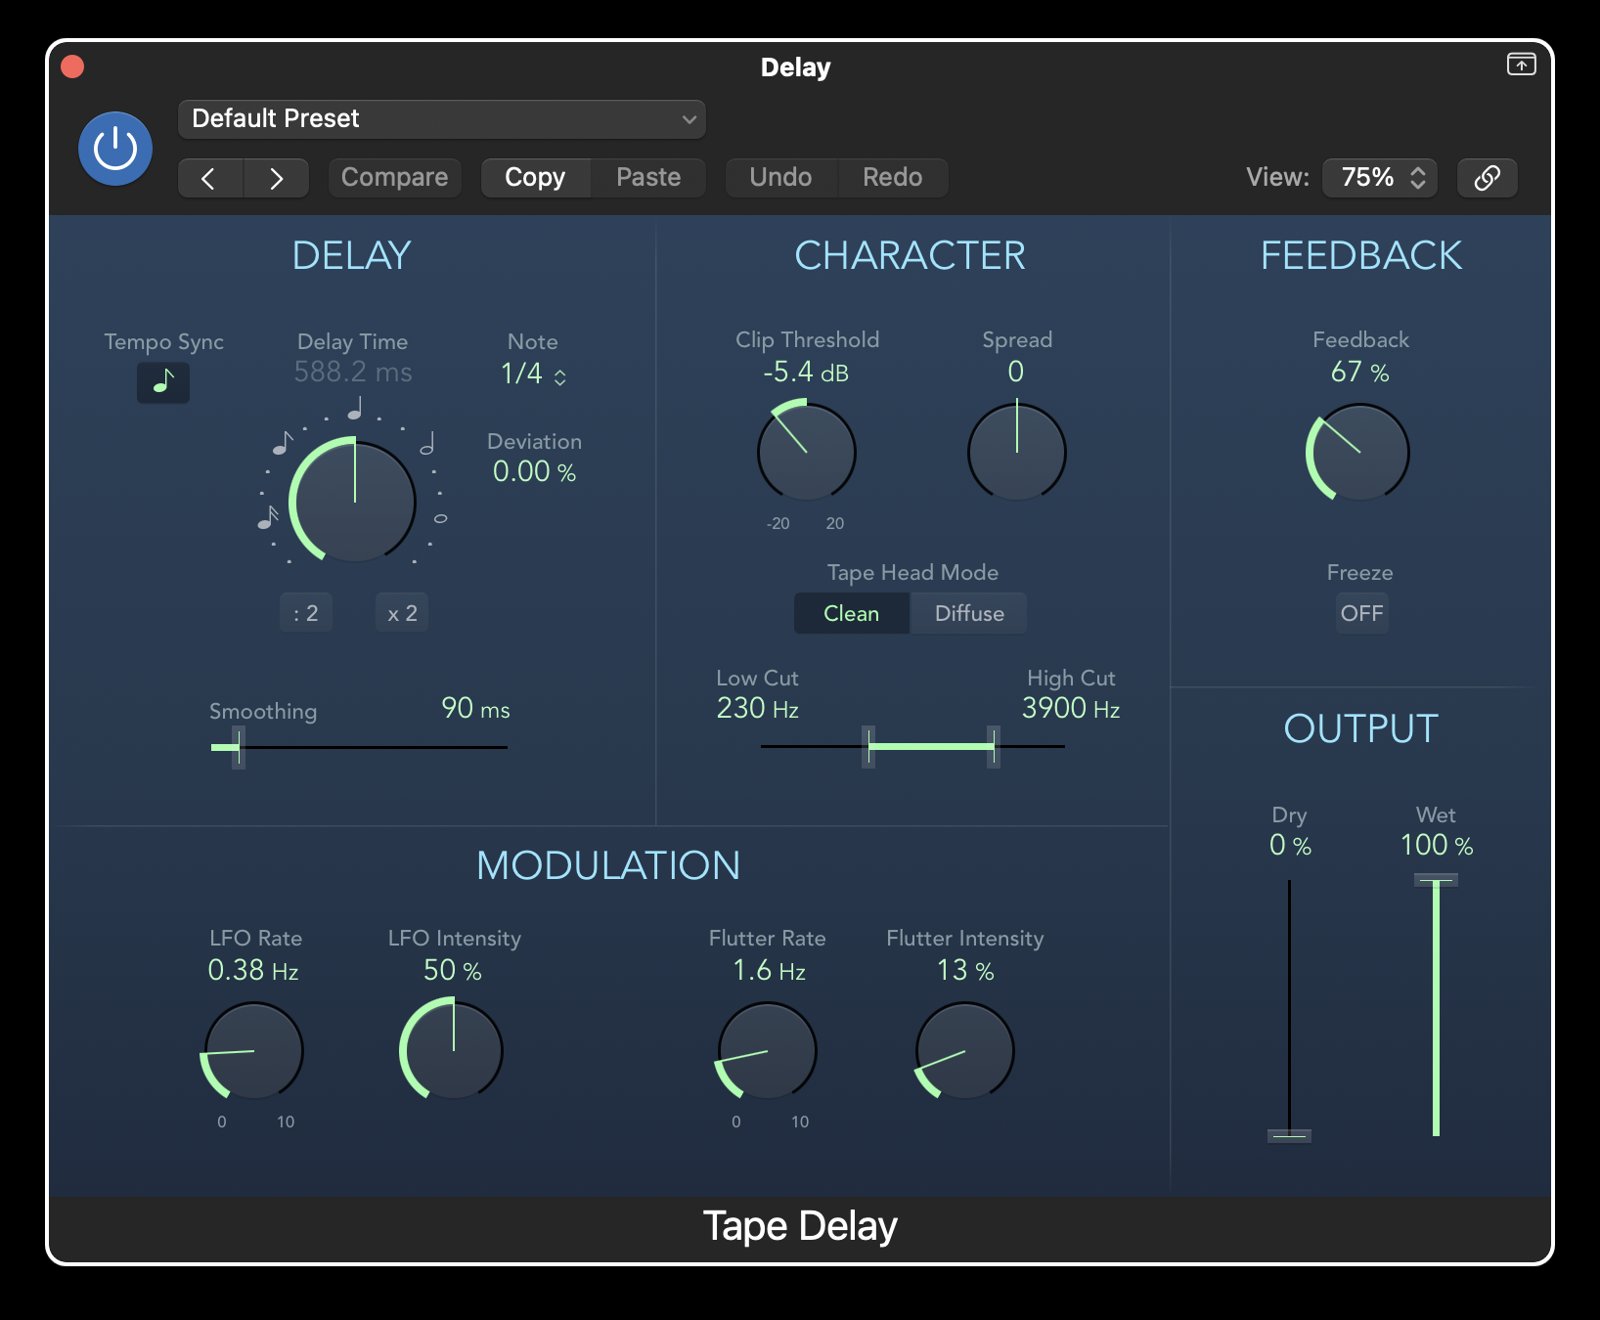
Fig 15: Logic's Tape Delay aux send
For a general, catch-all reverb, Valhalla VintageVerb is unbeatable.
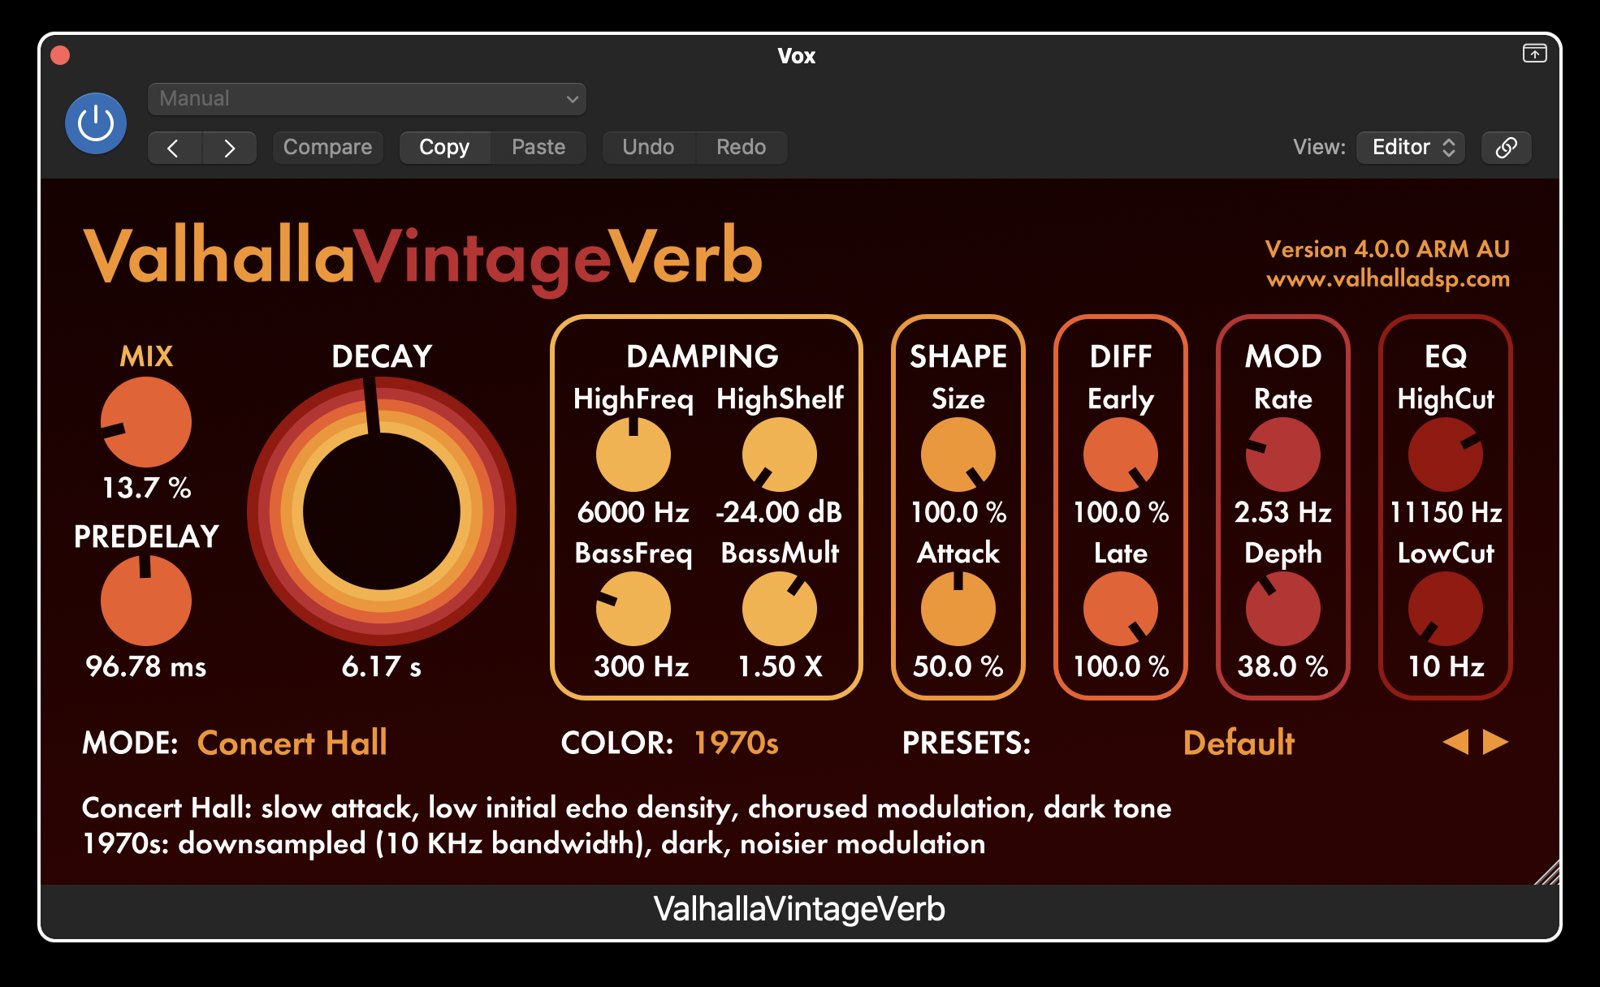
Fig 16: Valhalla VintageVerb when put directly on the signal chain
A crucial step on all these auxes is applying a strict low-cut EQ after the reverb plugin to prevent the low-mids from muddying up the track (White, 2020).
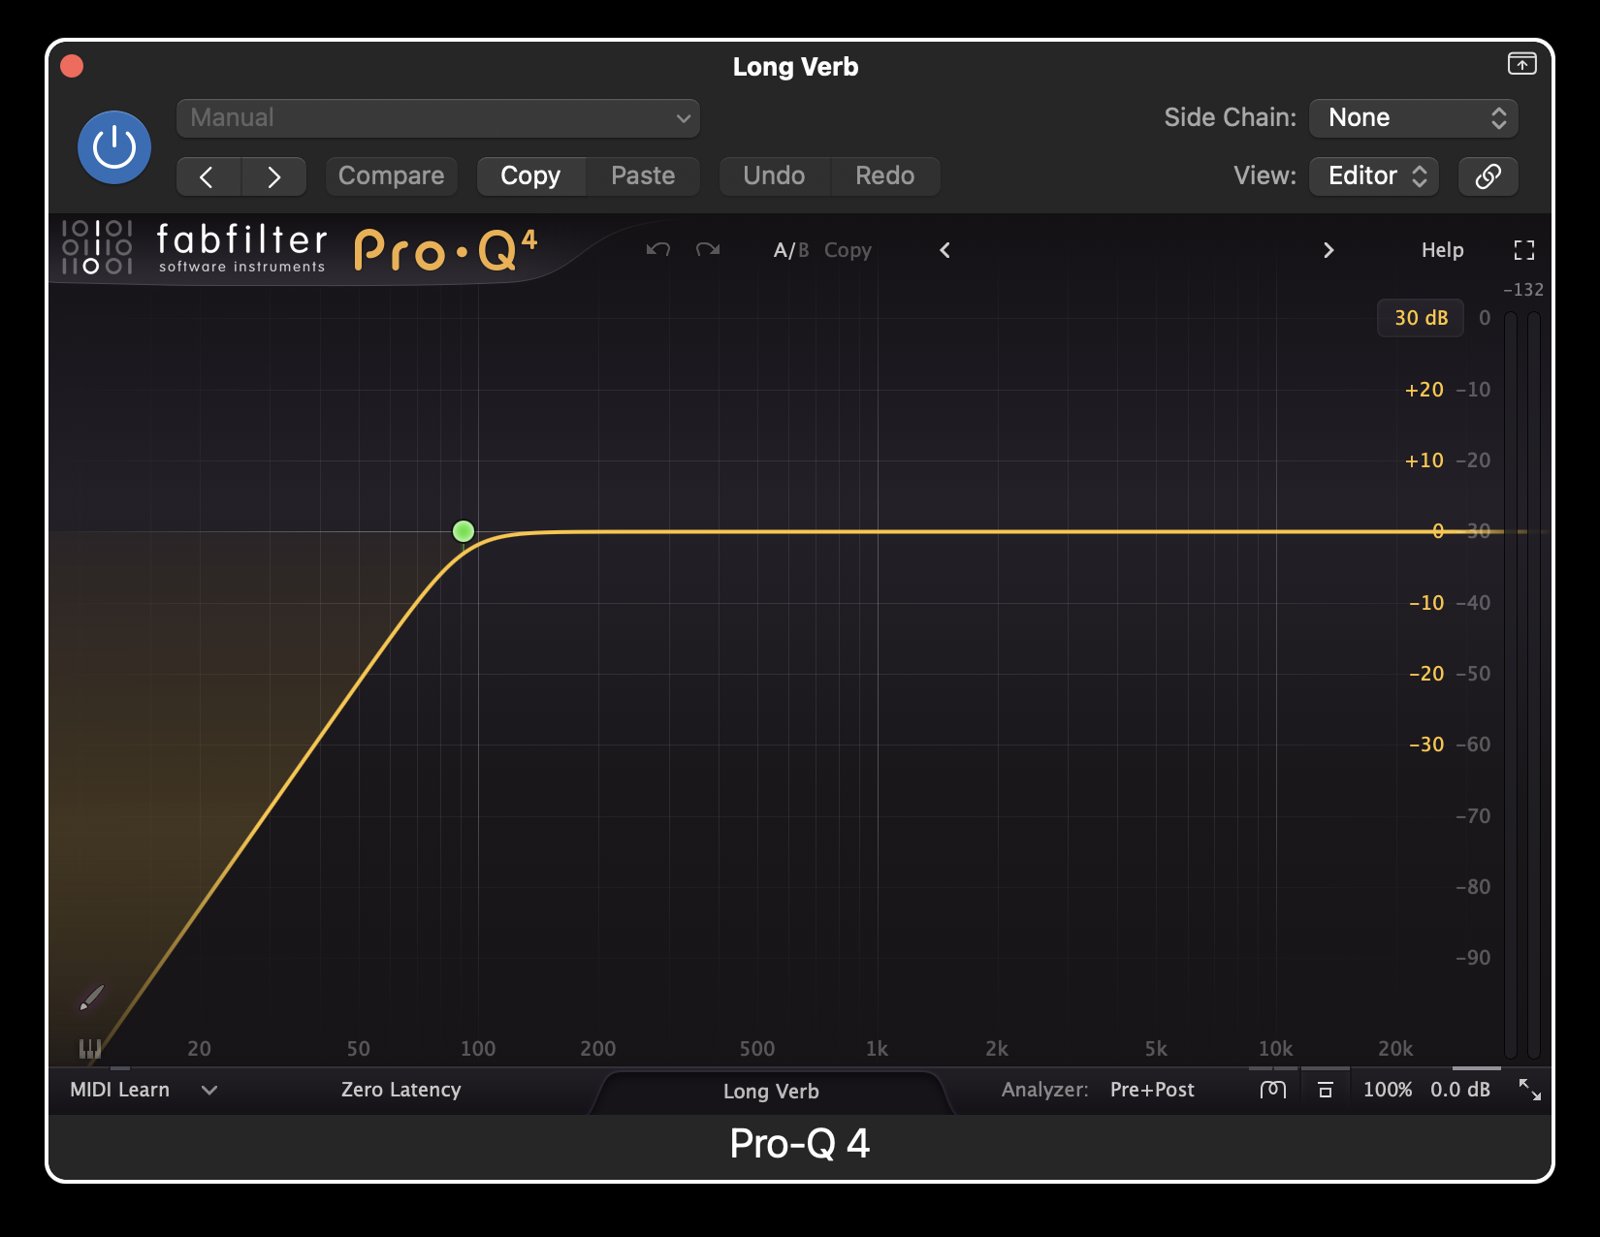
Fig 17: Strict low-cut EQ applied after the reverb plugin on the reverb aux
- Modulation: I frequently set up a dedicated Chorus aux track to send various guitars to for added width and movement.
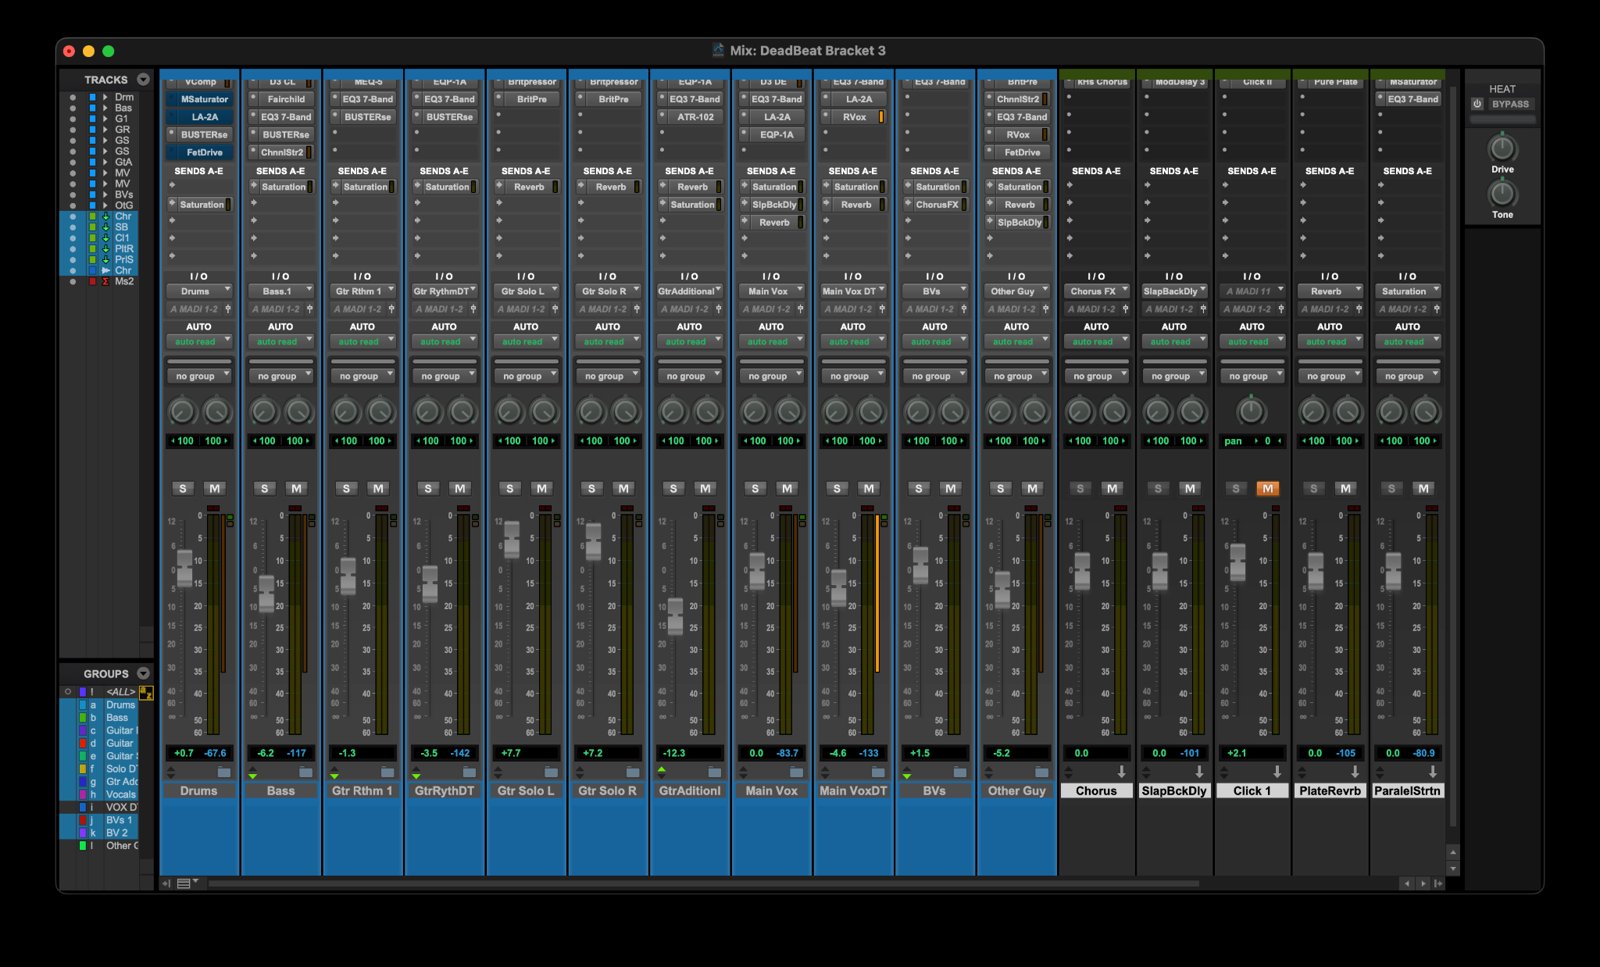
Fig 18: Dedicated Chorus aux track for width and movement
- Parallel Compression: For adding serious girth and weight to drums and bass, I use the Waves V-Comp, an incredible emulation of a classic stereo diode-bridge compressor (Robjohns, 2013).
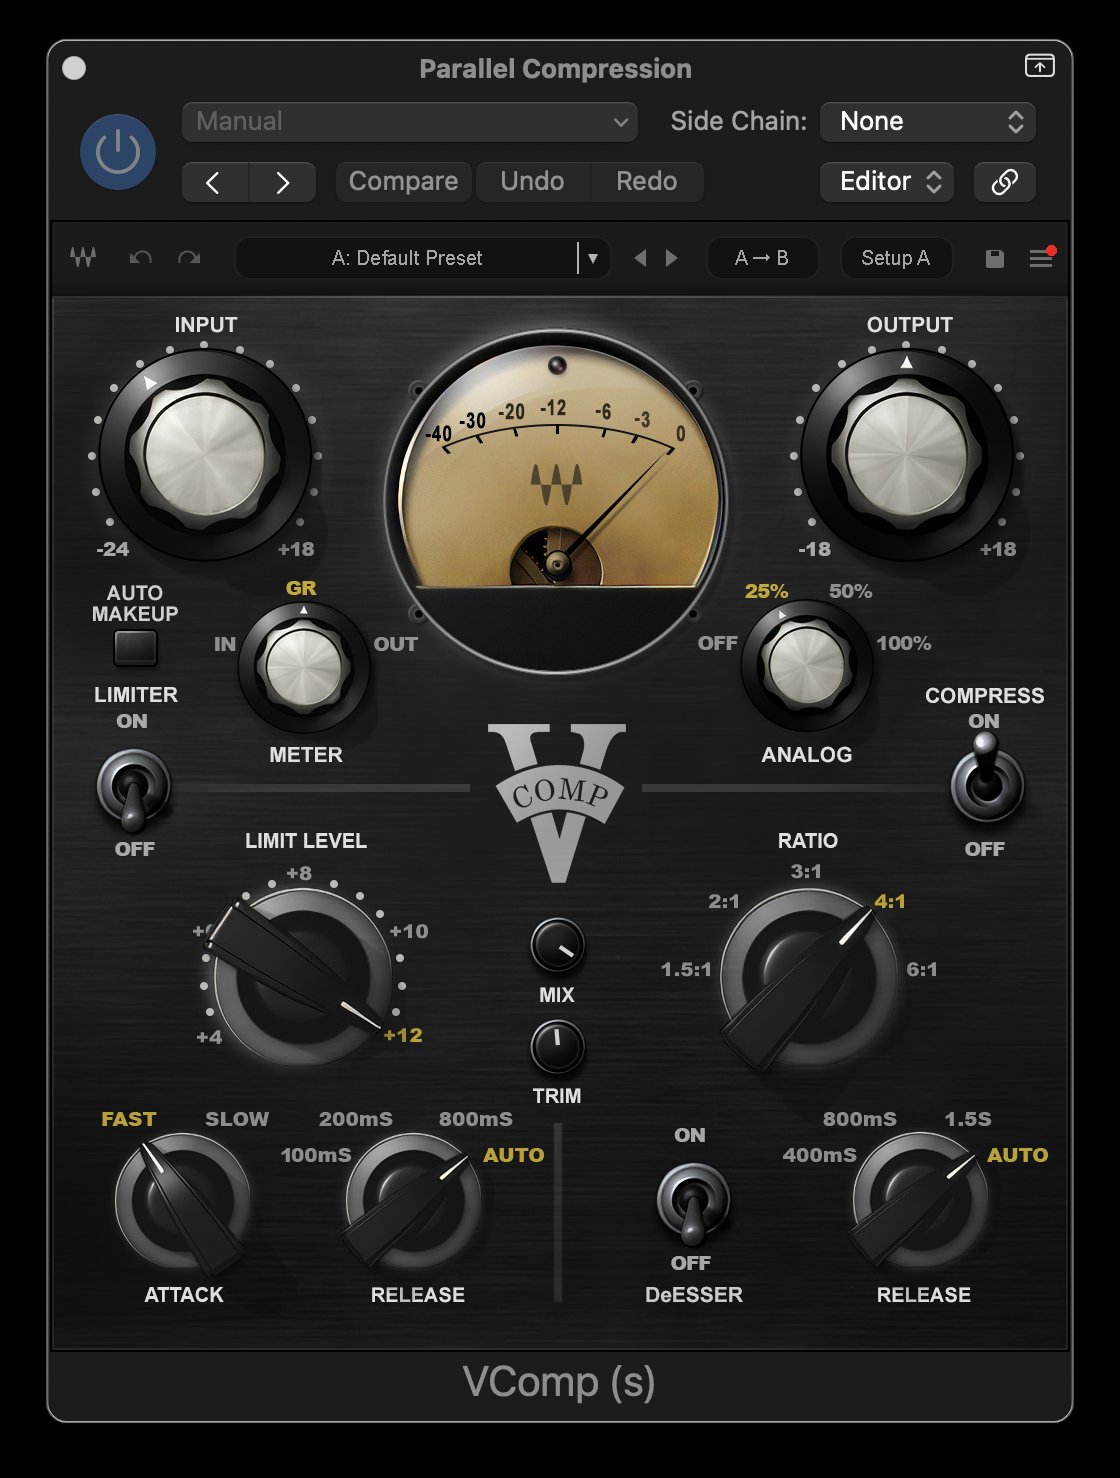
Fig 19: Waves V-Comp applied for parallel compression on drums and bass
- Parallel Saturation (The Glue)
As my mixes progressed, I found myself utilizing a dedicated Parallel Saturation bus across multiple projects (specifically Thunder, Lock/Key, and Brown Suit) (Rogers, 2021). By sending the drums, rhythm guitars, and occasionally the bass to a heavily driven saturation bus I was able to introduce incredible analog warmth, harmonic density, and cohesive "glue" without destroying the original transients.
The signal chain for this bus is highly deliberate. It begins with FabFilter Saturn 2, where I drive the entire frequency spectrum to 30% using the "Warm Tube" style to generate thick, even-order harmonics. Next, I place an EQ to apply a strict low-cut at around 100 Hz, stripping away any low-end rumble that the distortion might have amplified. Finally, to lock the texture in place, I run the signal through an 1176 compressor set to a 4:1 ratio, utilizing a medium attack and a fast release. I drive the input hard enough to hit about 5dB of gain reduction, creating a dense, controlled block of harmonic excitement that I can subtly blend underneath the clean, dynamic tracks (Streaky, 2024).
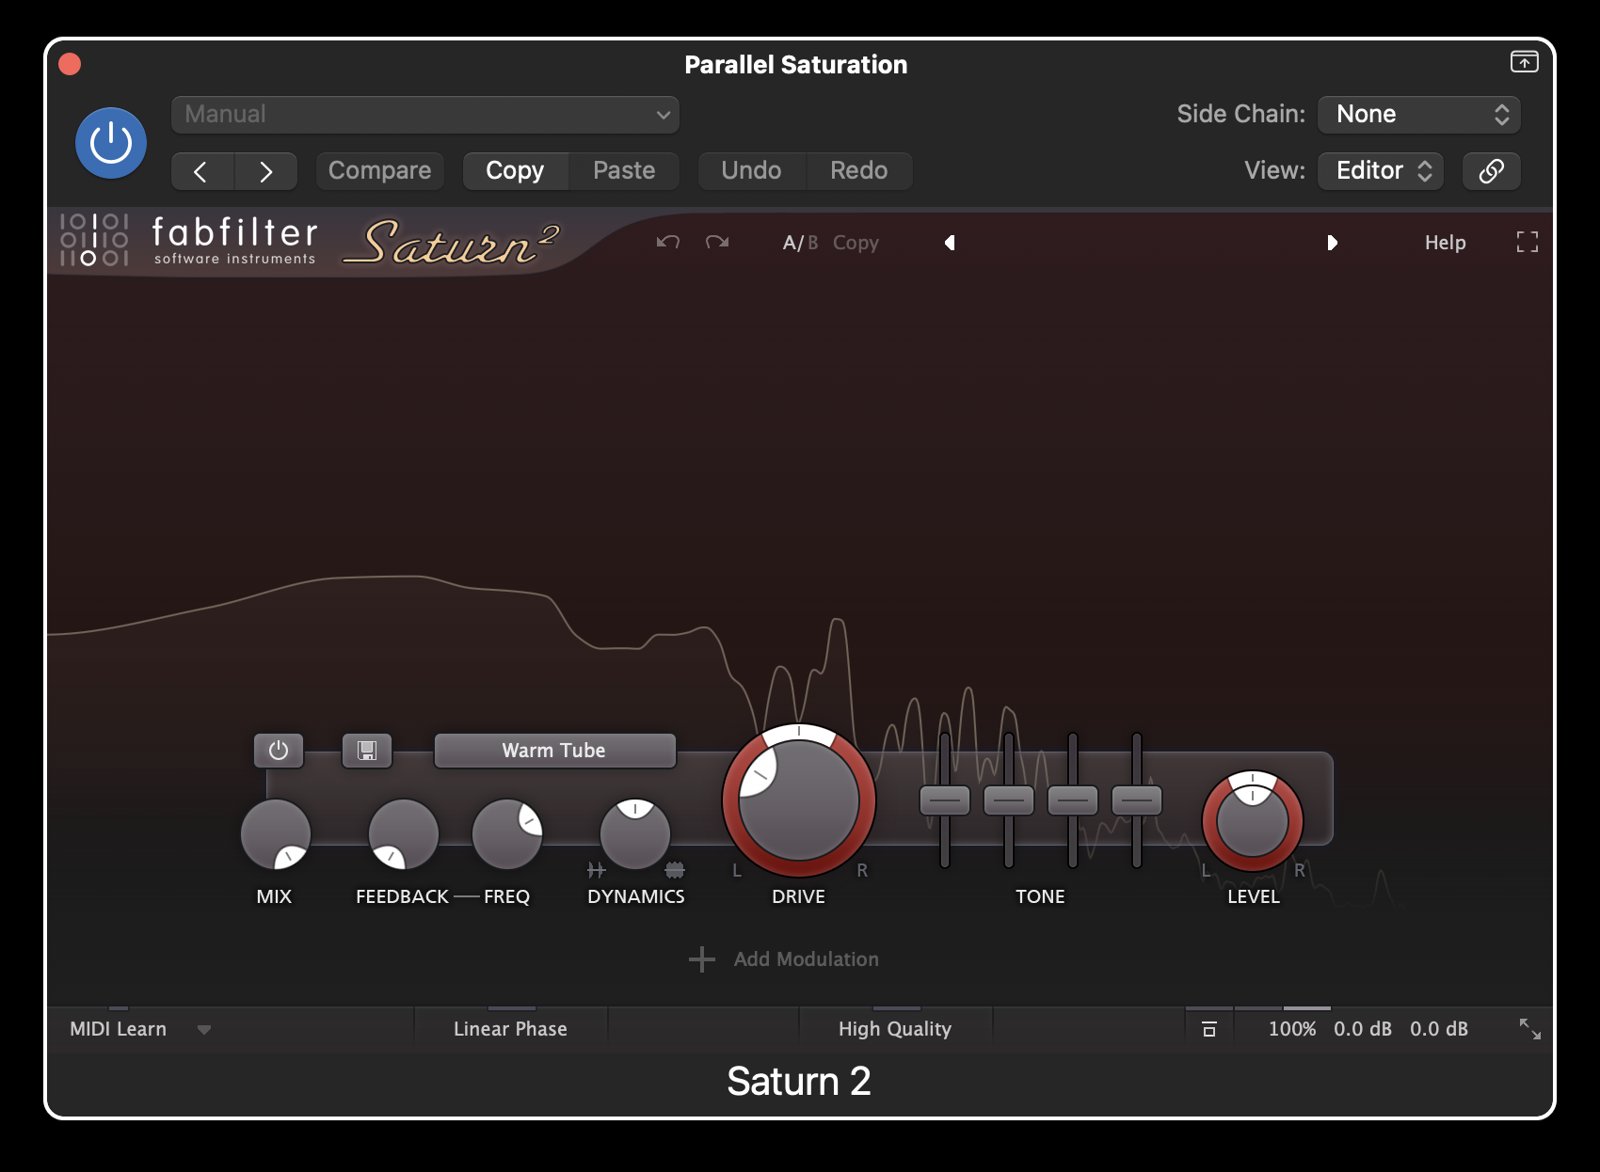
Fig 20: FabFilter Saturn 2

Fig 21: Parallel saturation bus
8. The Master Bus
To glue the tracks together and bring the loudness up to commercial standards, my mix bus chain remains highly consistent across all projects:
- UAD Ampex ATR-102: For analog tape saturation, glue, and gentle roll-off.
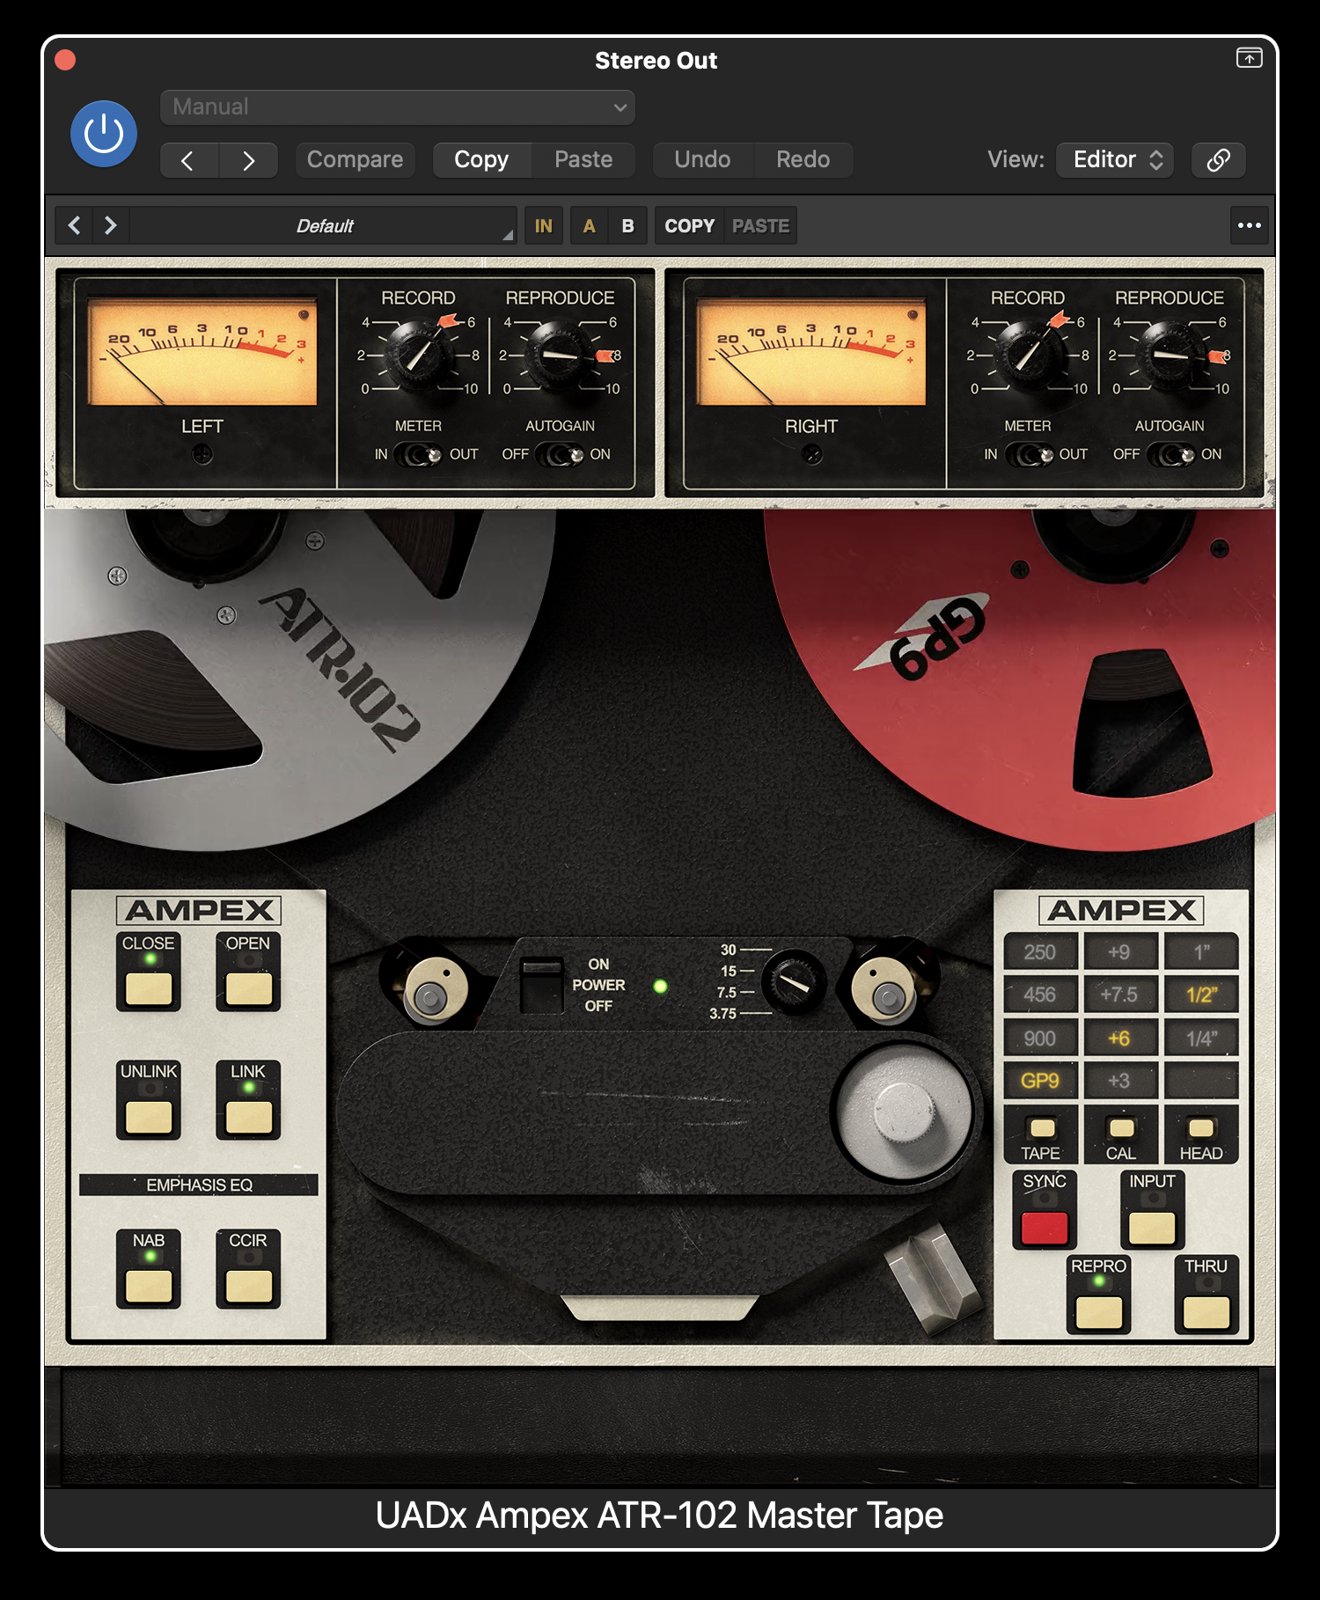
Fig 22: UAD Ampex ATR-102 applied to the master bus for analog tape saturation
- Sonnox Oxford Inflator: To increase harmonic density and perceived loudness without sacrificing transients (Sonnox, 2025).
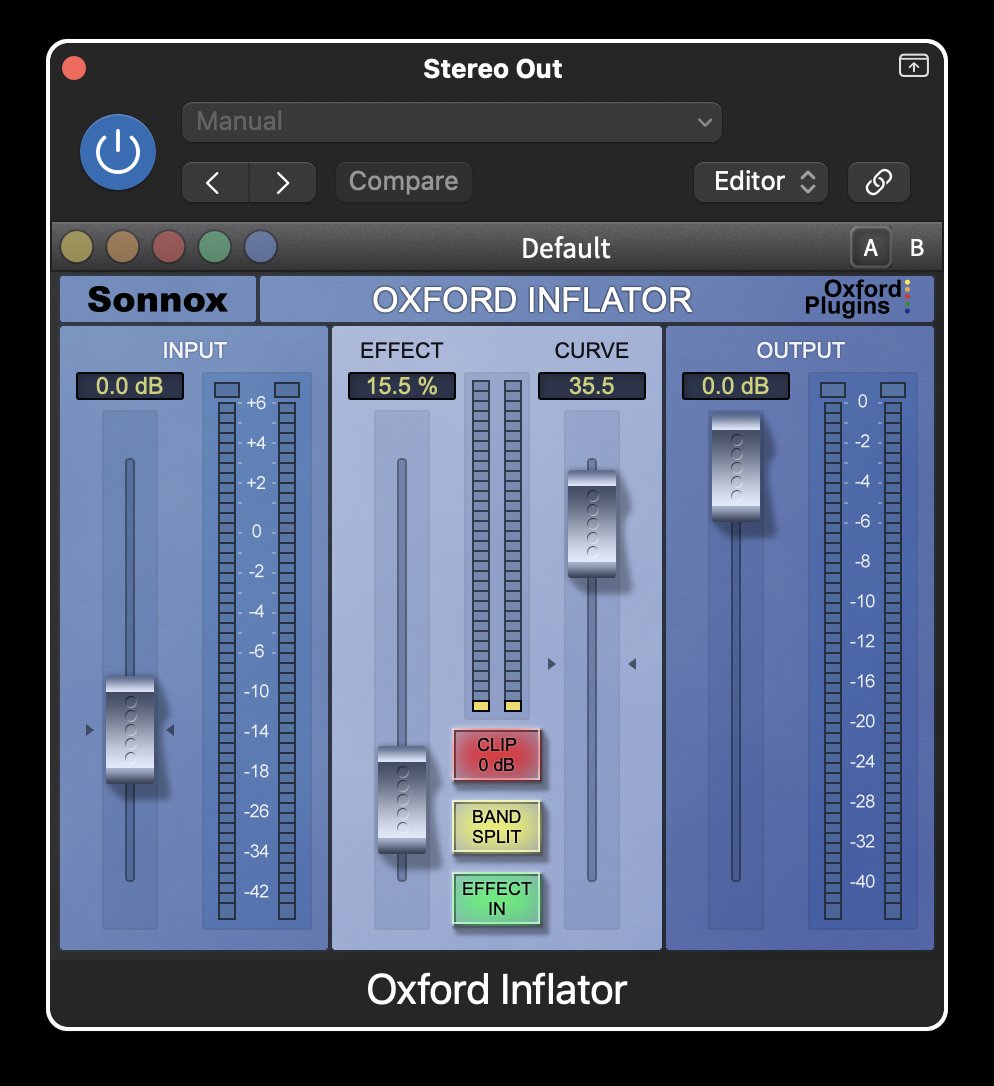
Fig 23: Sonnox Oxford Inflator applied to the master bus for harmonic density
- FabFilter Pro-L 2: The final brickwall limiter to transparently push the LUFS up to commercial levels (White Sea Studio, 2025).
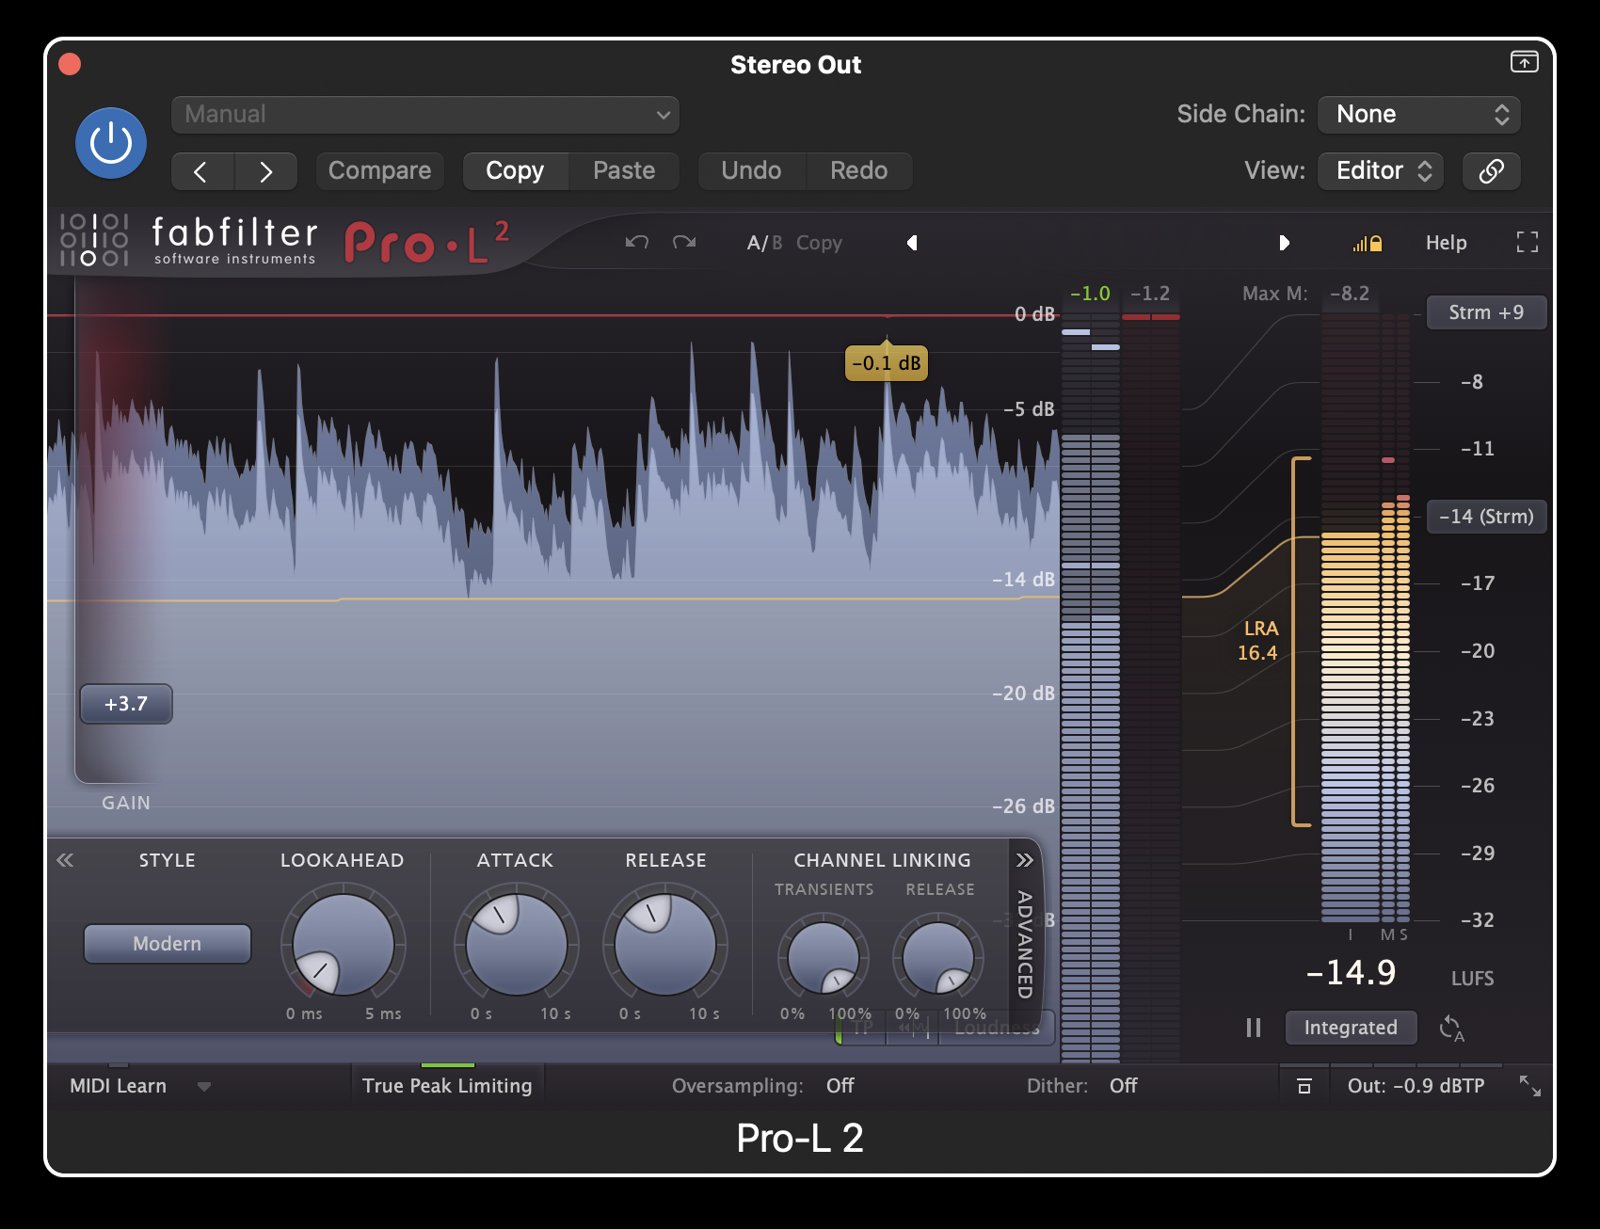
Fig 24: FabFilter Pro-L 2 brickwall limiter applied to the master bus
Track-by-Track Breakdowns: The Unique Techniques
While the foundation remains the same, every song demands bespoke creative decisions. Here is a look at the unique approaches I took for each individual mix.
Rachel - Brown Suit
- Raw, Unprocessed Drums: Unlike modern pop tracks that require heavy drum processing, the drums on Brown Suit are incredibly raw. I used almost zero processing—just careful gain staging and a tiny bit of compression to let the natural acoustic kit breathe.
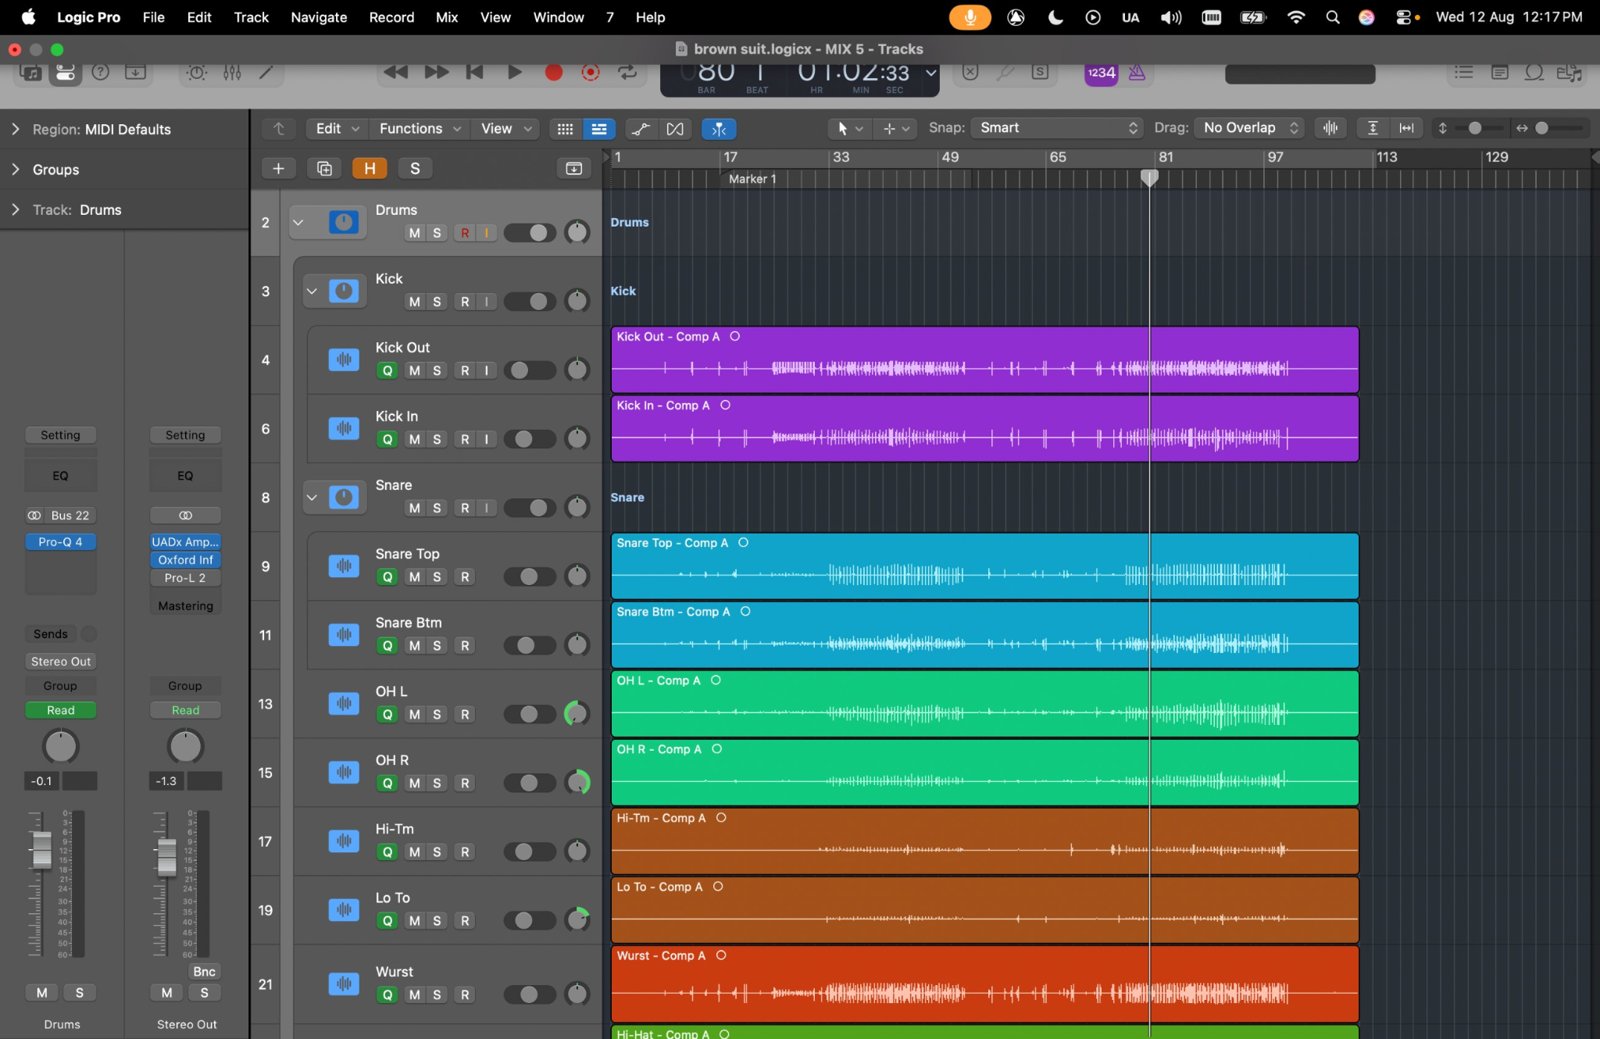
Fig 25: Minimal processing and compression on the raw acoustic drum kit
- Healing the Guitars: The guitar tracks were sent to me post-recording by the producer and unfortunately contained problematic clicks and pops. Since re-recording wasn't an option, I had to meticulously heal the audio and EQ the amp tones in a way that masked the artifacts so they wouldn't translate into the final mix.
- The MIDI Violin Trick: The song featured electric violins that sounded unpleasantly squeaky, but the artist wanted a lush, massive orchestral sound. To fix this, I ran the original violin audio through Logic’s Flex Pitch, extracted the pitch data, and converted it into MIDI (Apple Inc., no date). I then fed that MIDI data into the BBC Symphony Orchestra VST, assigning different violin articulations to each take. The result transformed a thin, squeaky recording into a massive, cinematic string section (Ball, 2018).
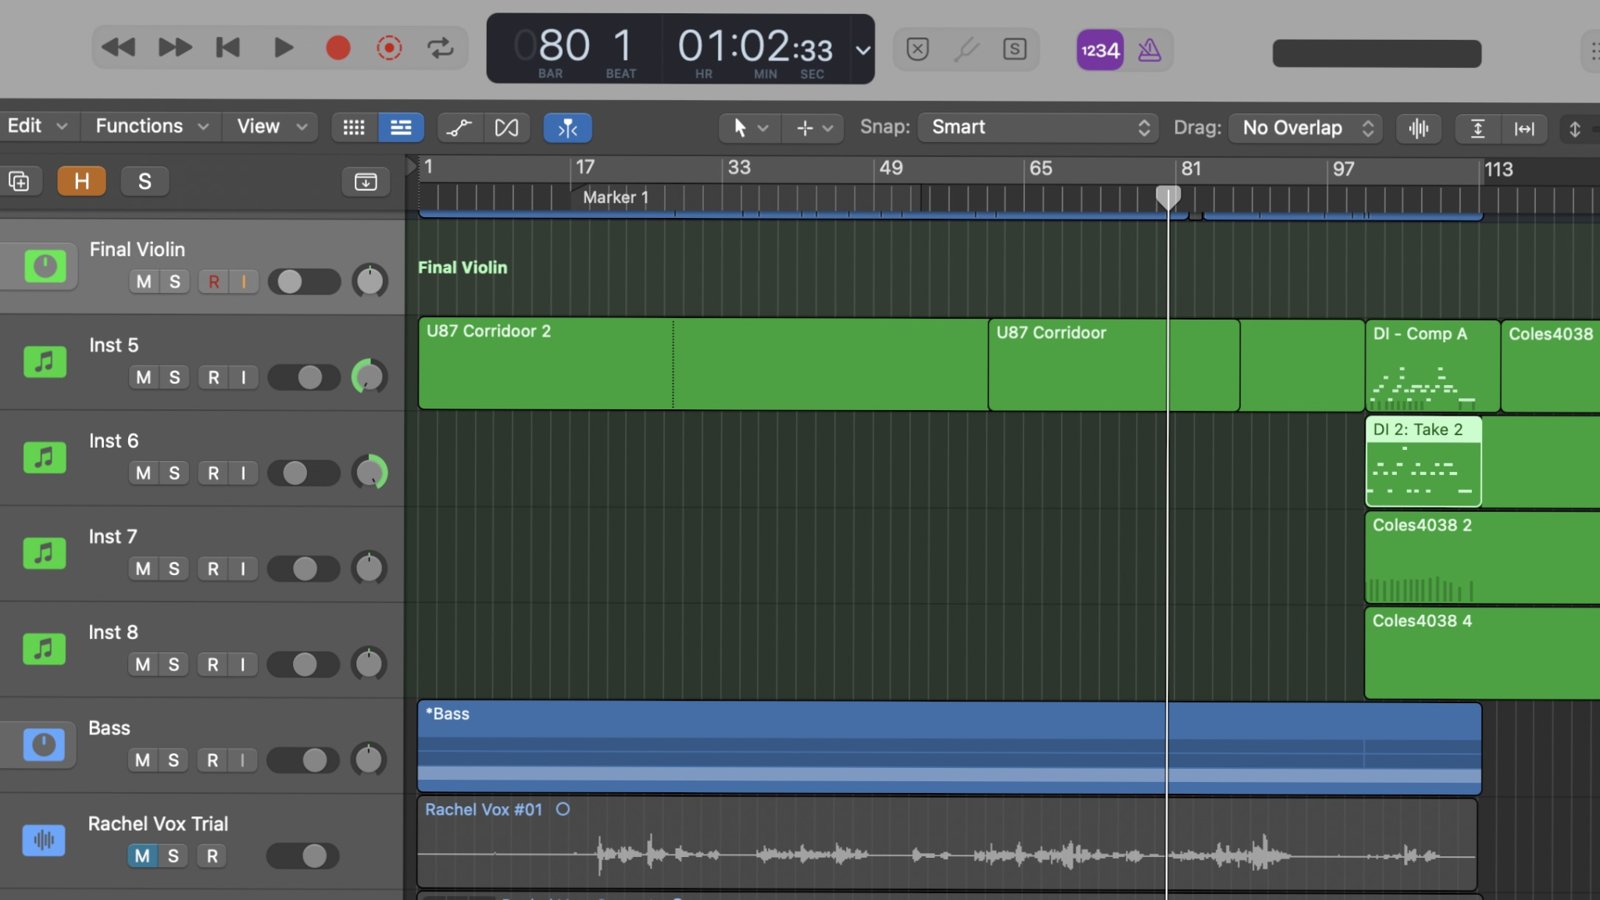
Fig 26: Violin pitch data extracted via Logic's Flex Pitch and then converted to MIDI tracks
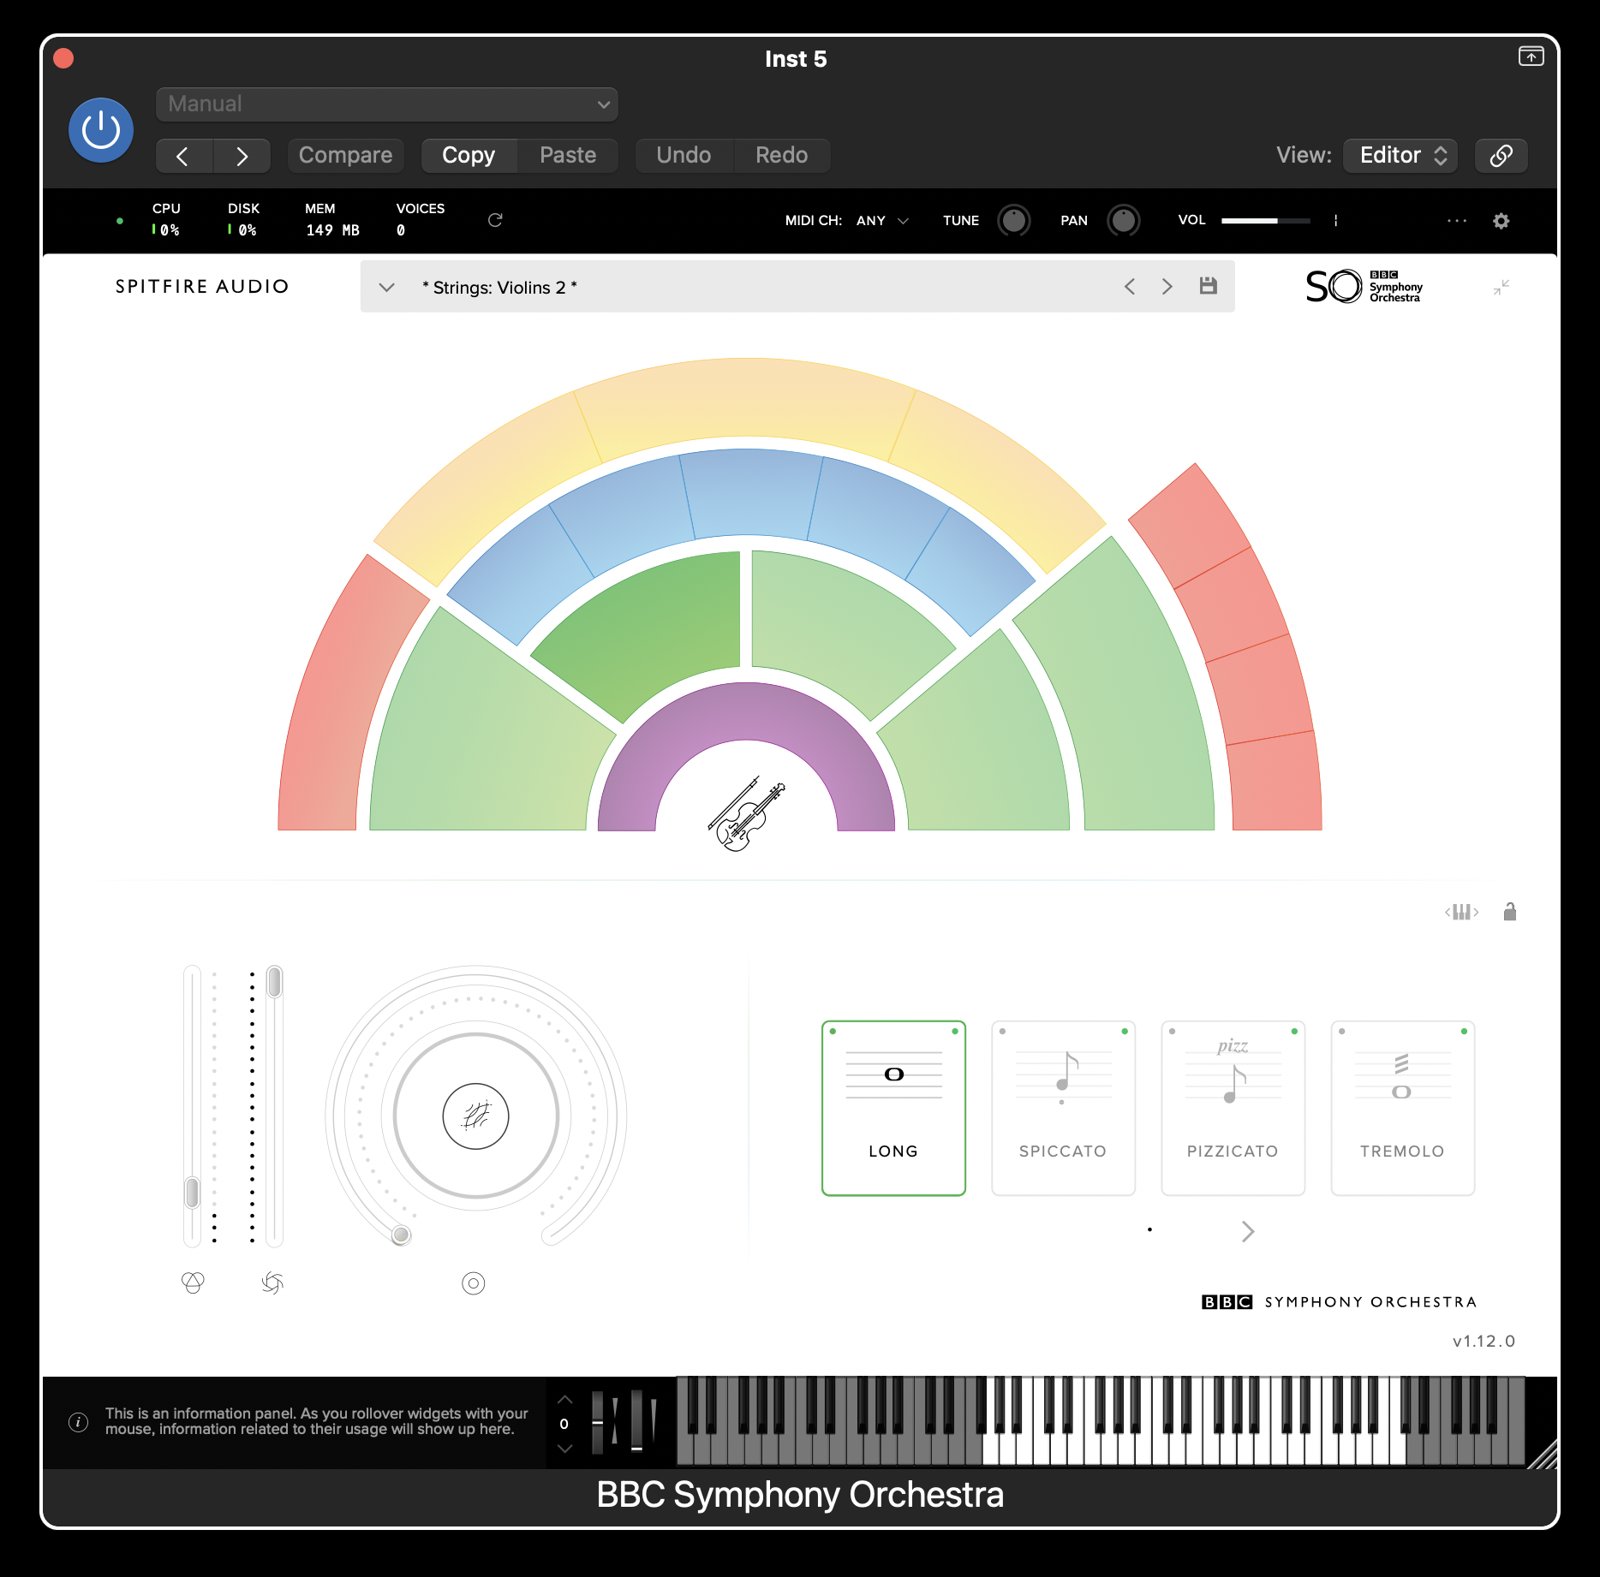
Fig 27: Extracted MIDI data routed to the BBC Symphony Orchestra VST
- Softening the Harmonies (Enveloper):
The backing vocal harmonies were coming in a bit too aggressively, distracting from the lead. To fix this, I placed a transient shaper (Enveloper) on the harmony bus, pulling back the attack. This smoothed out their entry, allowing them to swell naturally into the mix rather than hitting the listener abruptly.
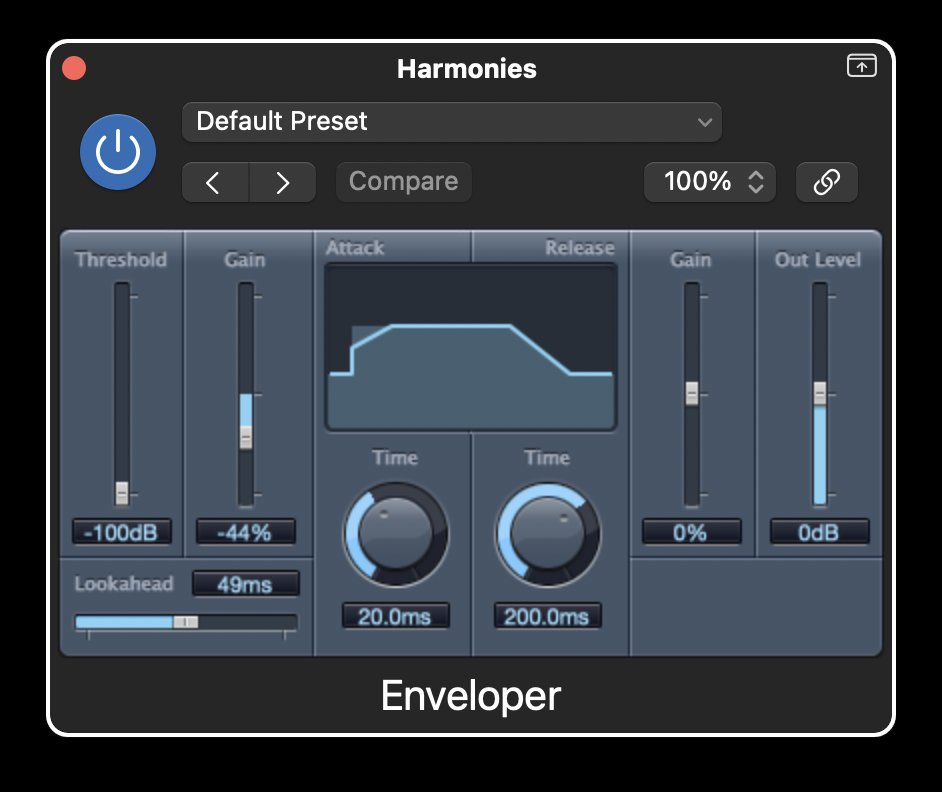
Fig 28: Enveloper transient shaper pulling back the attack on the backing vocal harmony bus
Deadbeat Bracket - Just Friends
- The Pro Tools Architecture: This track was mixed in Pro Tools, utilizing native Pro Tools plugins. The tone was so well-established during the tracking phase that I intentionally kept processing to an absolute minimum.
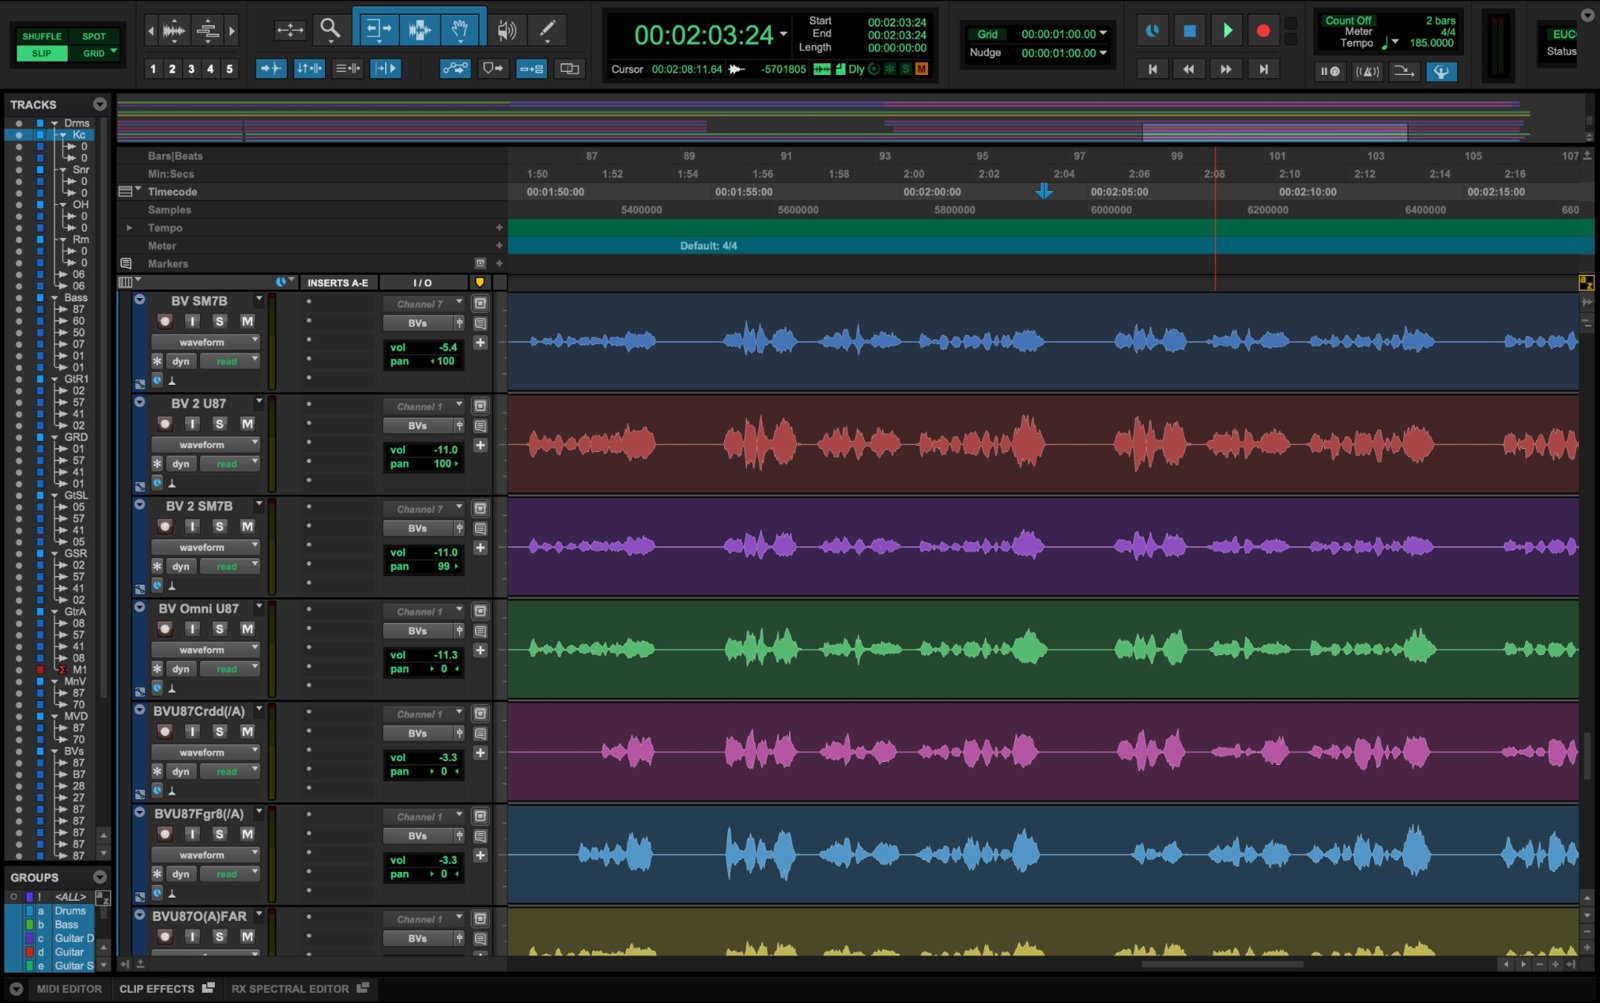
Fig 29: The Pro Tools session
- Massive Folder Routing: The mix was entirely about balancing massive groups. I utilized Pro Tools' Folder functionality heavily: a massive folder for Rhythm Guitars (and their double tracks), Solo Guitars (and DTs), Bass, and Drums (which contained sub-folders for kick, snare, overheads, and room). The mix was built methodically from the inside out—treating the individual elements, then the subgroups, and finally the massive folders.
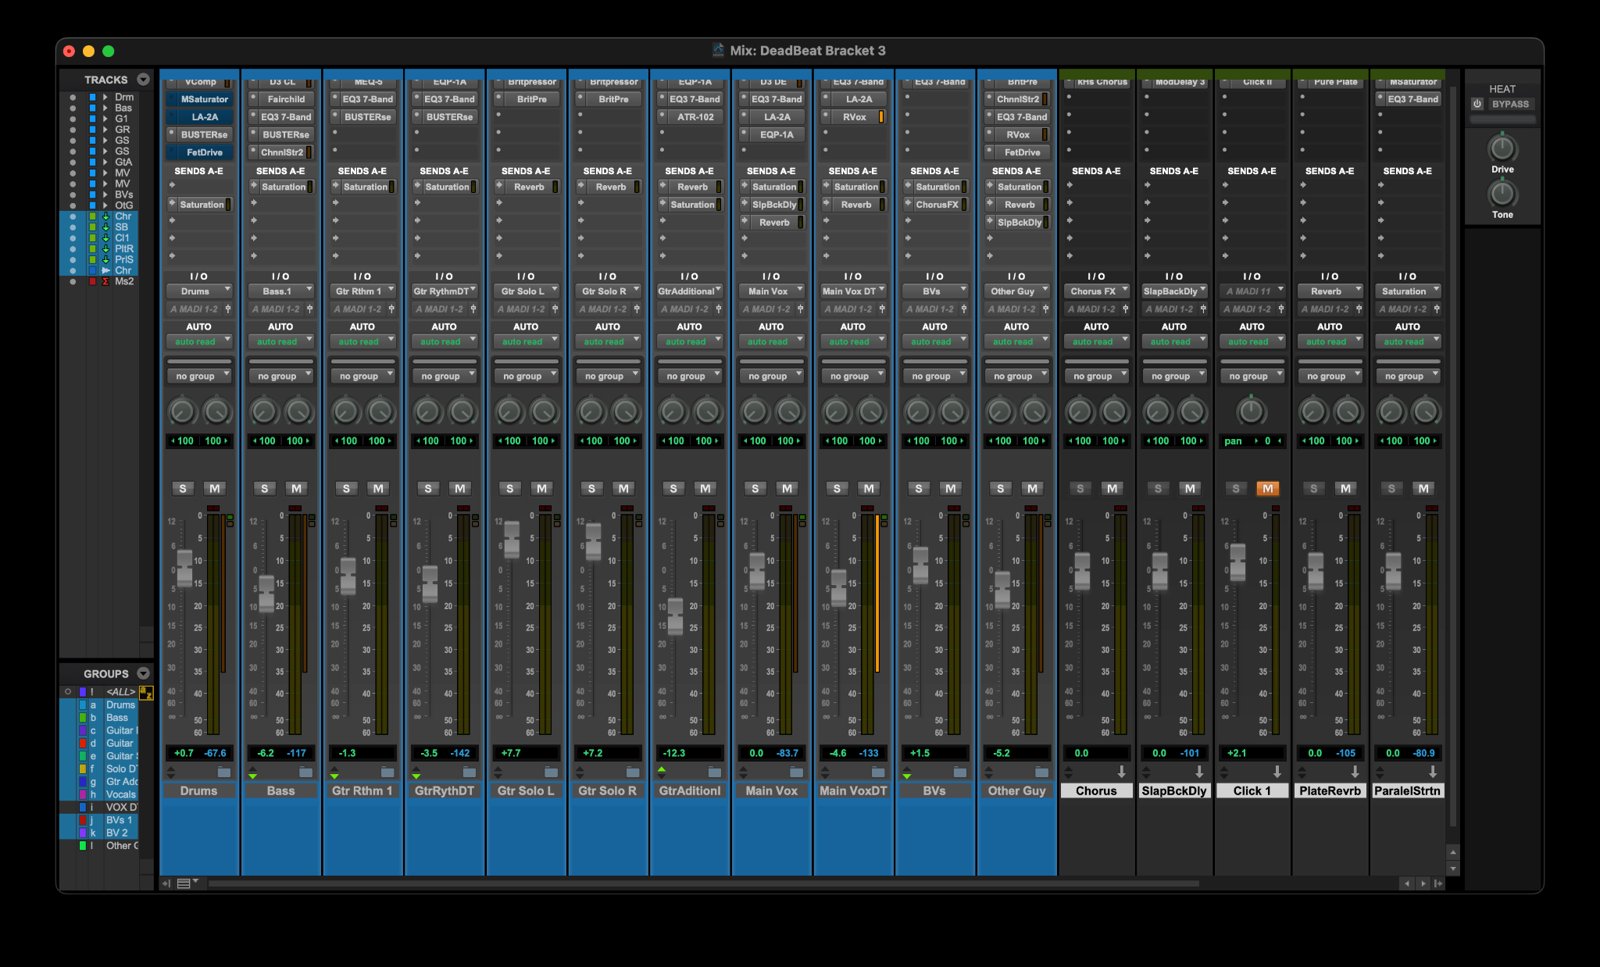
Fig 30: Pro Tools folder routing structure for rhythm guitars, bass, and drums
- Using Slap Back Delay for Vocal Presence: Just Friends is a heavy, guitar-driven punk record, which meant the lead vocal was constantly fighting against a massive wall of distorted guitars. I wanted to bring the vocals out and make them sound focused and "in front" of the mix, but simply applying a big gain boost would have eaten up my headroom and disrupted the balance. Instead, I used a slap delay. By sending the vocal to a very short, fast delay tucked subtly underneath the dry signal, it creates a psychoacoustic effect that pulls the vocal forward. It gives the voice an aggressive, present edge that cuts perfectly through the dense guitars without washing it out like a long reverb would (Templeton, 2020).
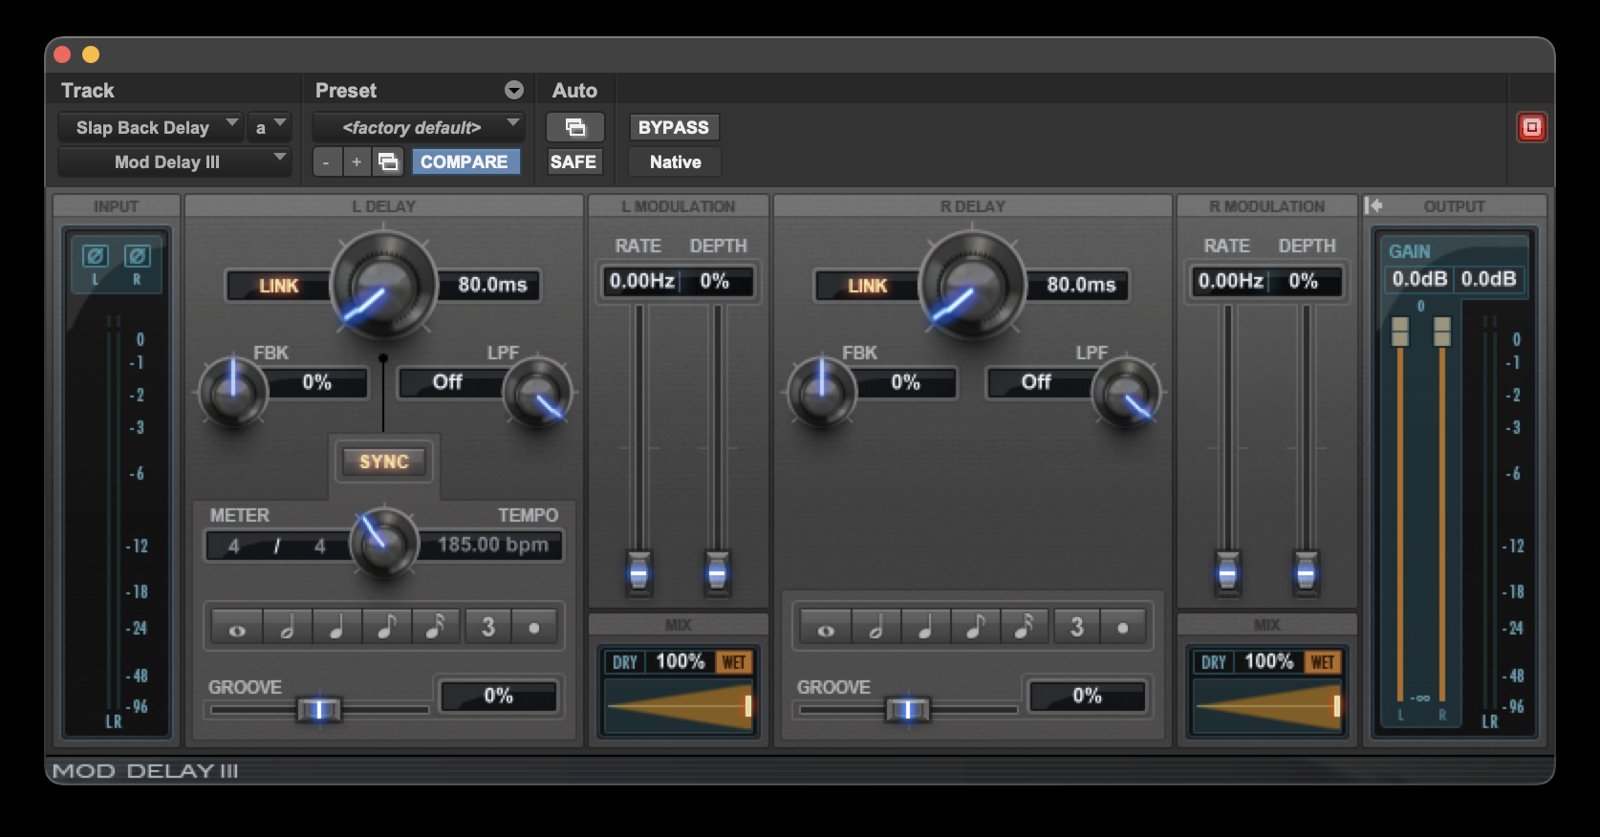
Fig 31: Slap Back Delay
Joey Bonito - It's Getting Late
- Carving the Low-Mids: This indie track was a little low-mid heavy, with drums, vocals, acoustic guitars, and a prominently featured piano all fighting for the same frequency real estate. I needed to harness the piano's warmth without making the mix muddy (a problem I didn't have in Brown Suit, where the piano didn't have so much low end build up). I solved this dilemma by doing a big cut from the low mids in the Acoustic Guitars.
- Piano Excitation and Dynamic EQ: The piano was tracked in A/B stereo with U87s. To make it cut through, I applied Logic’s Exciter plugin to both the individual L/R channels and the piano stack to generate upper harmonics. I then used a Dynamic EQ with a notch at 380 Hz. This tamed the mud only when the frequencies built up too much, keeping the piano sounding full and rich without masking the vocal.
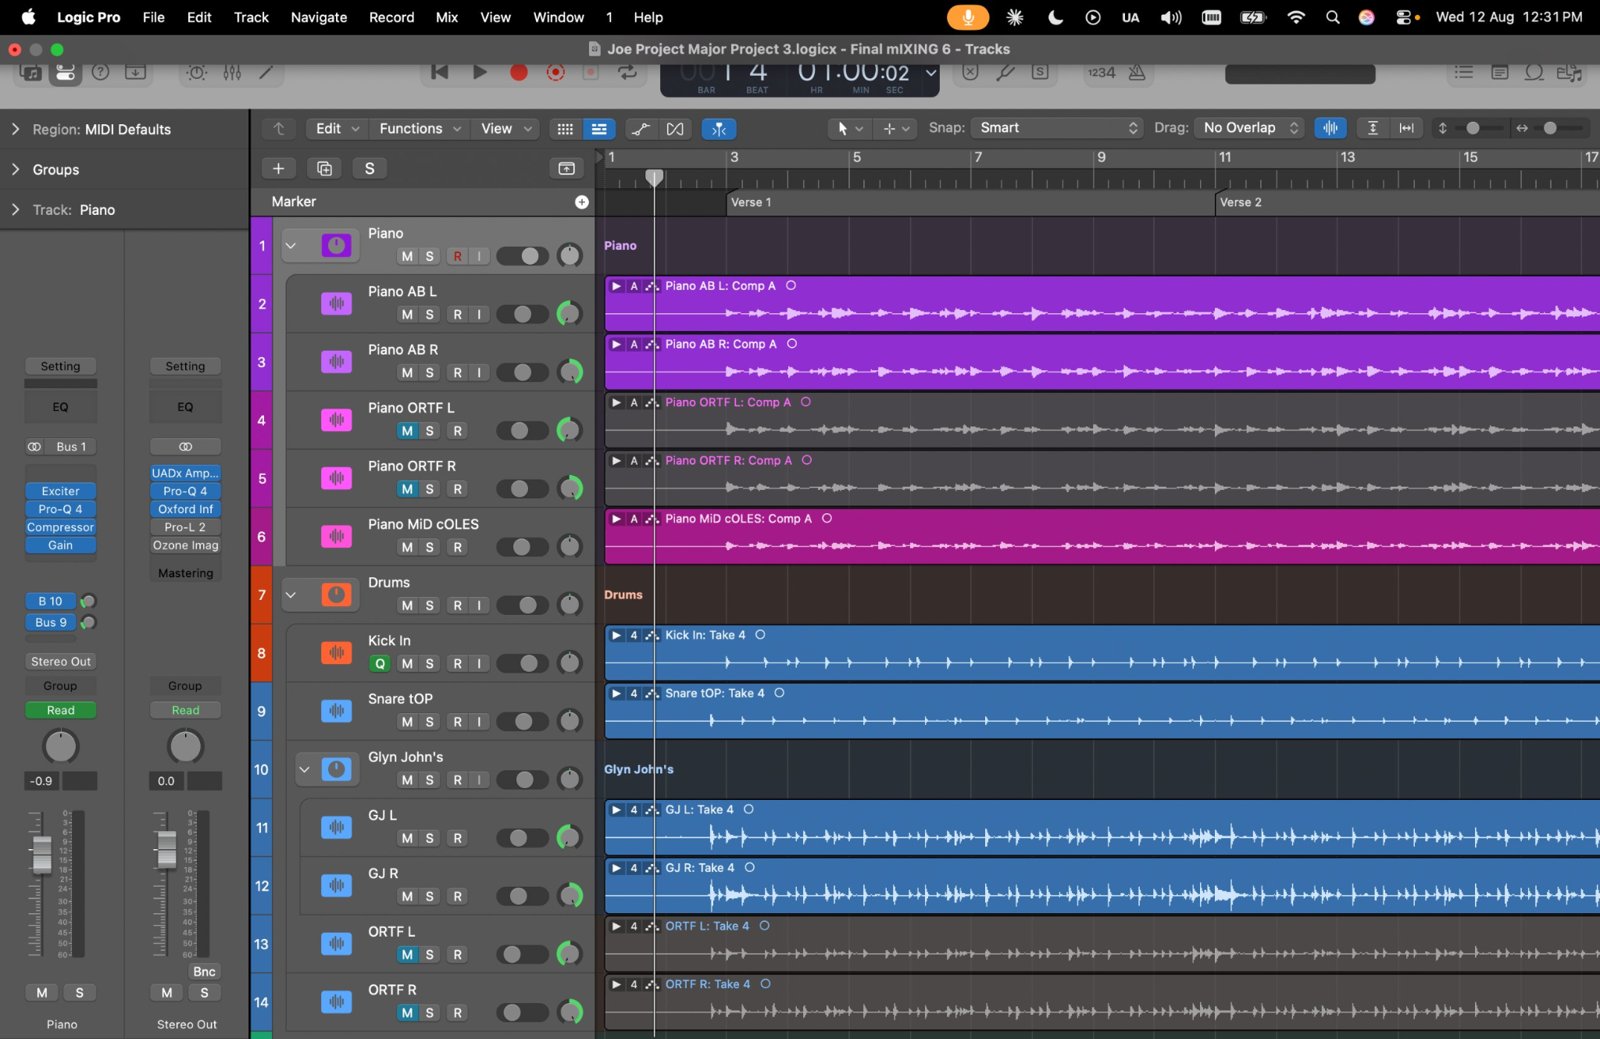
Fig 32: Logic's Exciter plugin generating upper harmonics on the piano channels
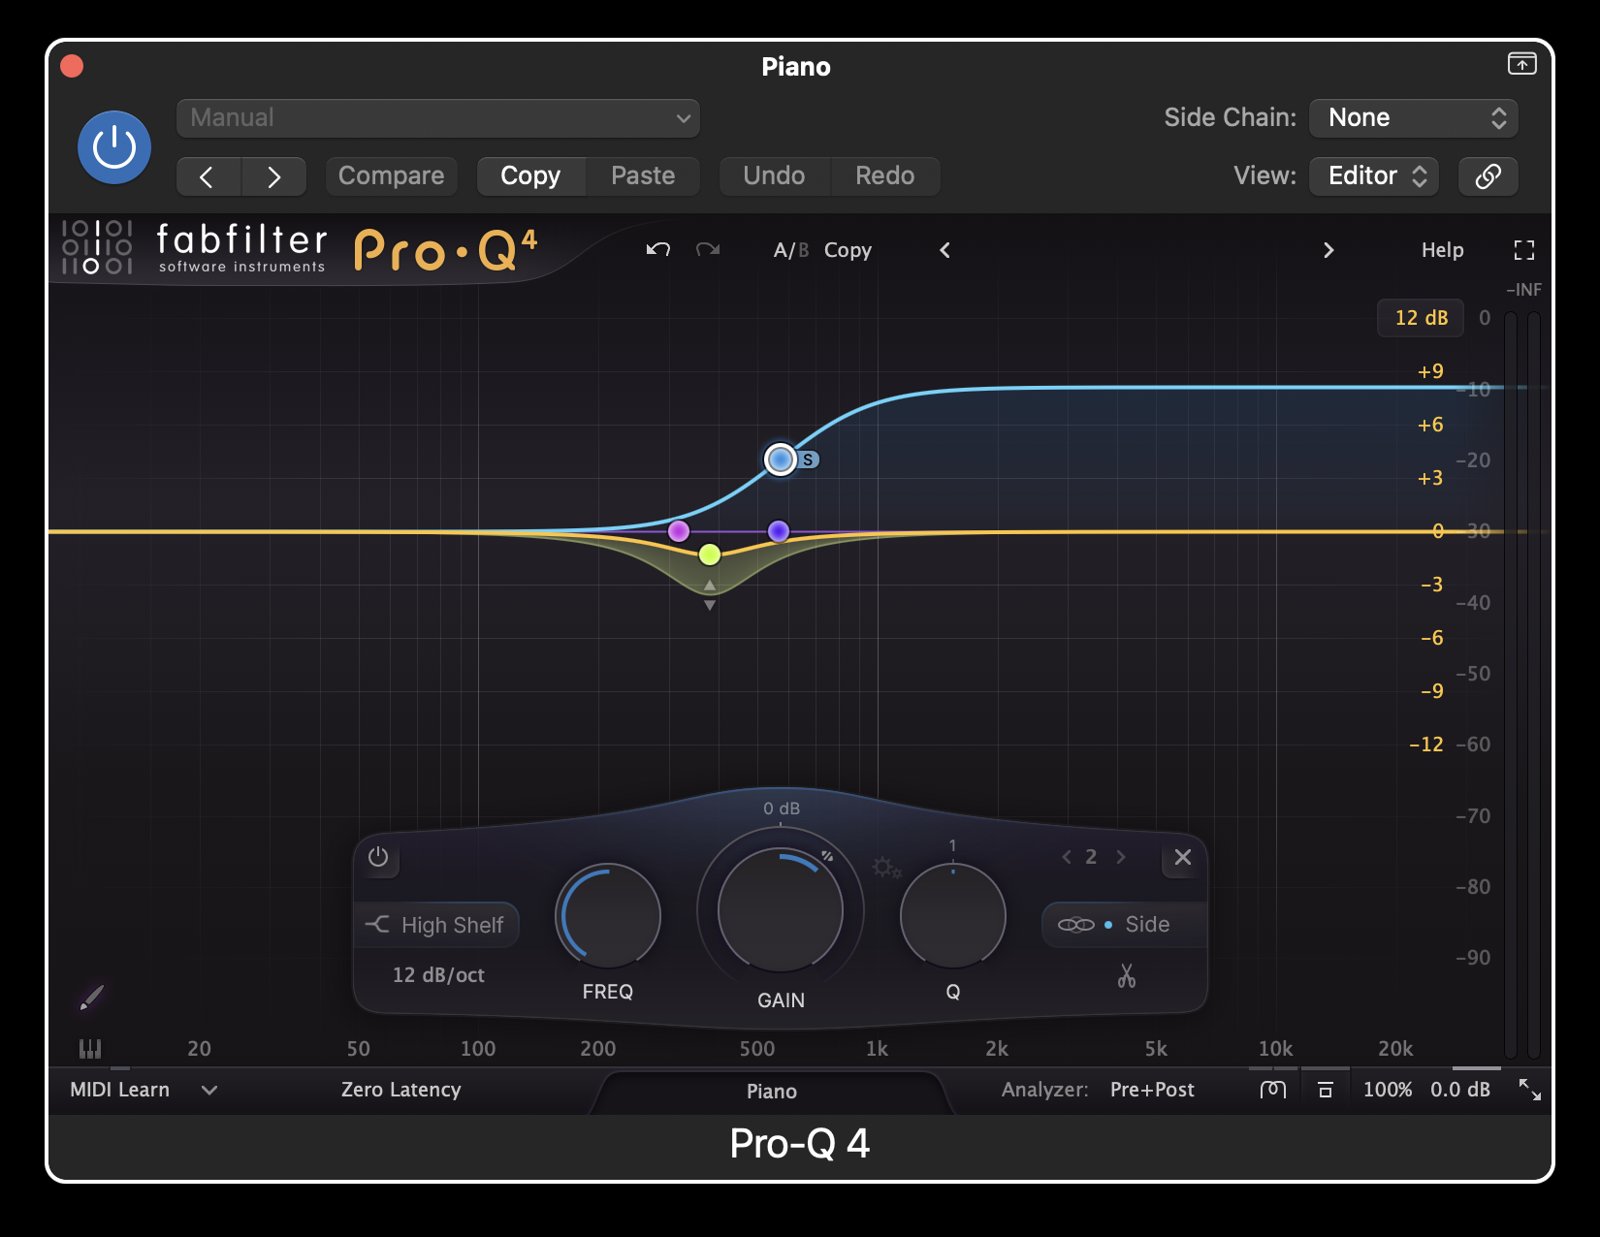
Fig 33: Dynamic EQ notch at 380 Hz on the piano stack
- The Gibberish Intro: During tracking, Joey mumbled some gibberish into the mic that had a great sonic texture. As a creative mixing decision, I chopped that specific phrase and placed it at the very beginning of the track. Joey loved it, and it became the official intro to the song.
Thomas Lee - Lock/Key
- The Great Phase Flip: Upon checking phase correlation, I realized the entire bass stack was completely out of phase with the guitar stack. During the tracking session, the bass amp and guitar amp had been facing opposite directions in the live room. To fix the low-end cancellation, I had to flip the phase on the entire bass track stack.
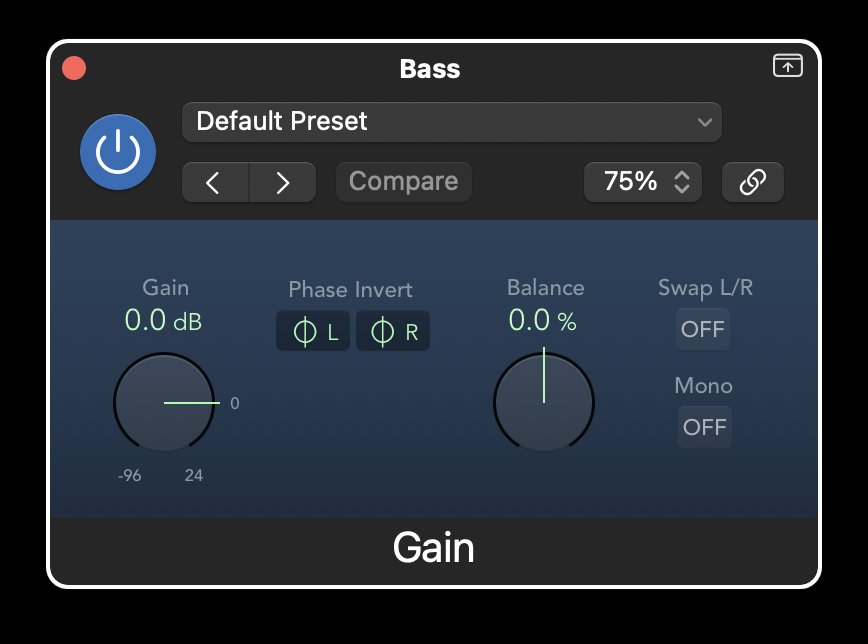
Fig 34: Phase flip engaged on the entire bass track stack
- Mixing a Baritone: Thomas has a rich, low baritone voice, and the instrumental arrangement was also heavily focused in the low-mids. Getting the lead vocal to sit up front without gutting the instruments required a very long, precise vocal signal chain to carve out exact frequencies.
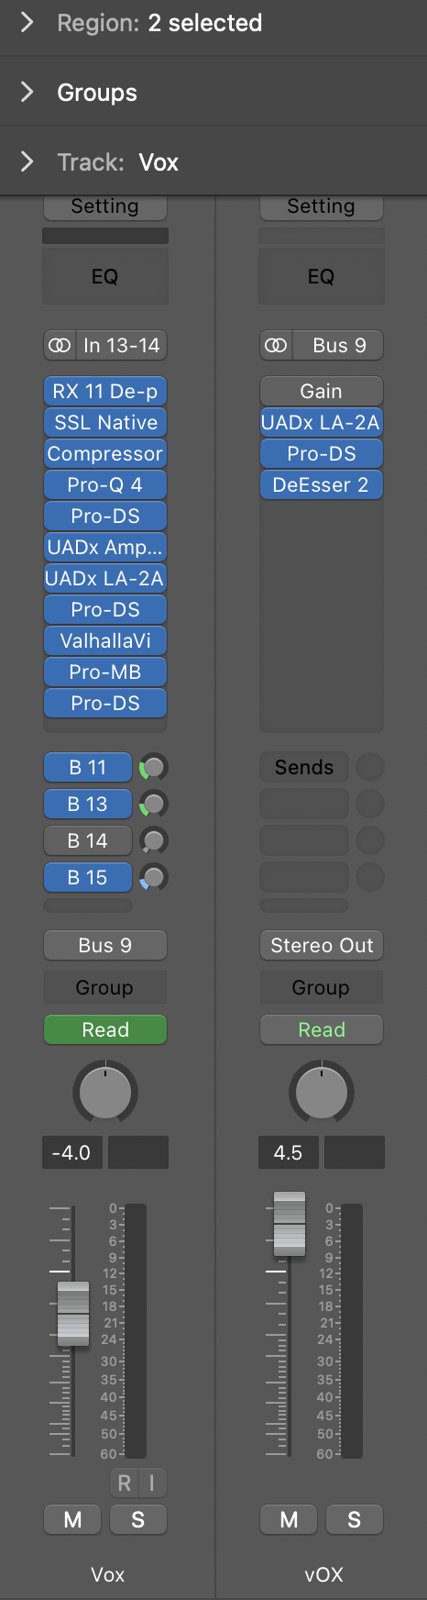
Fig 35: Vocal chain fused for Thomas Lee
- Automating Reverbs and Delays: The arrangement of Lock/Key features a lot of empty, atmospheric space. To make the track feel dynamic, I heavily automated the Valhalla Room and Tape Delay aux sends, pushing the spatial effects up in the empty pockets and pulling them back when the vocal was active (Subphotic, 2025).
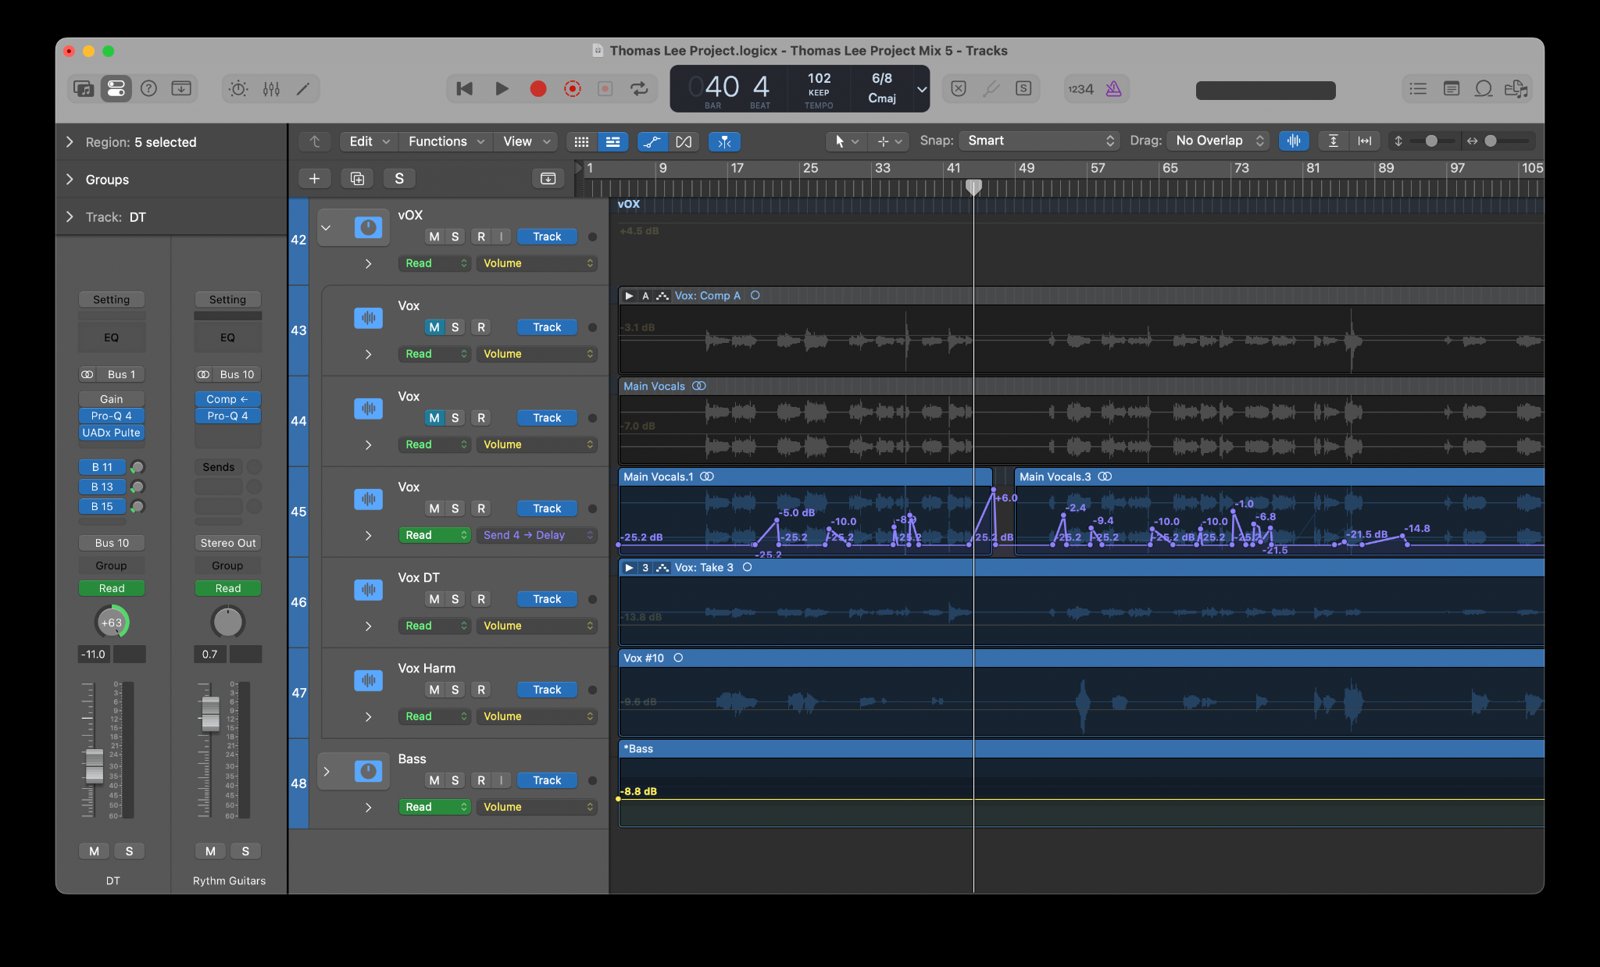
Fig 36: Automation of the Valhalla Room aux send
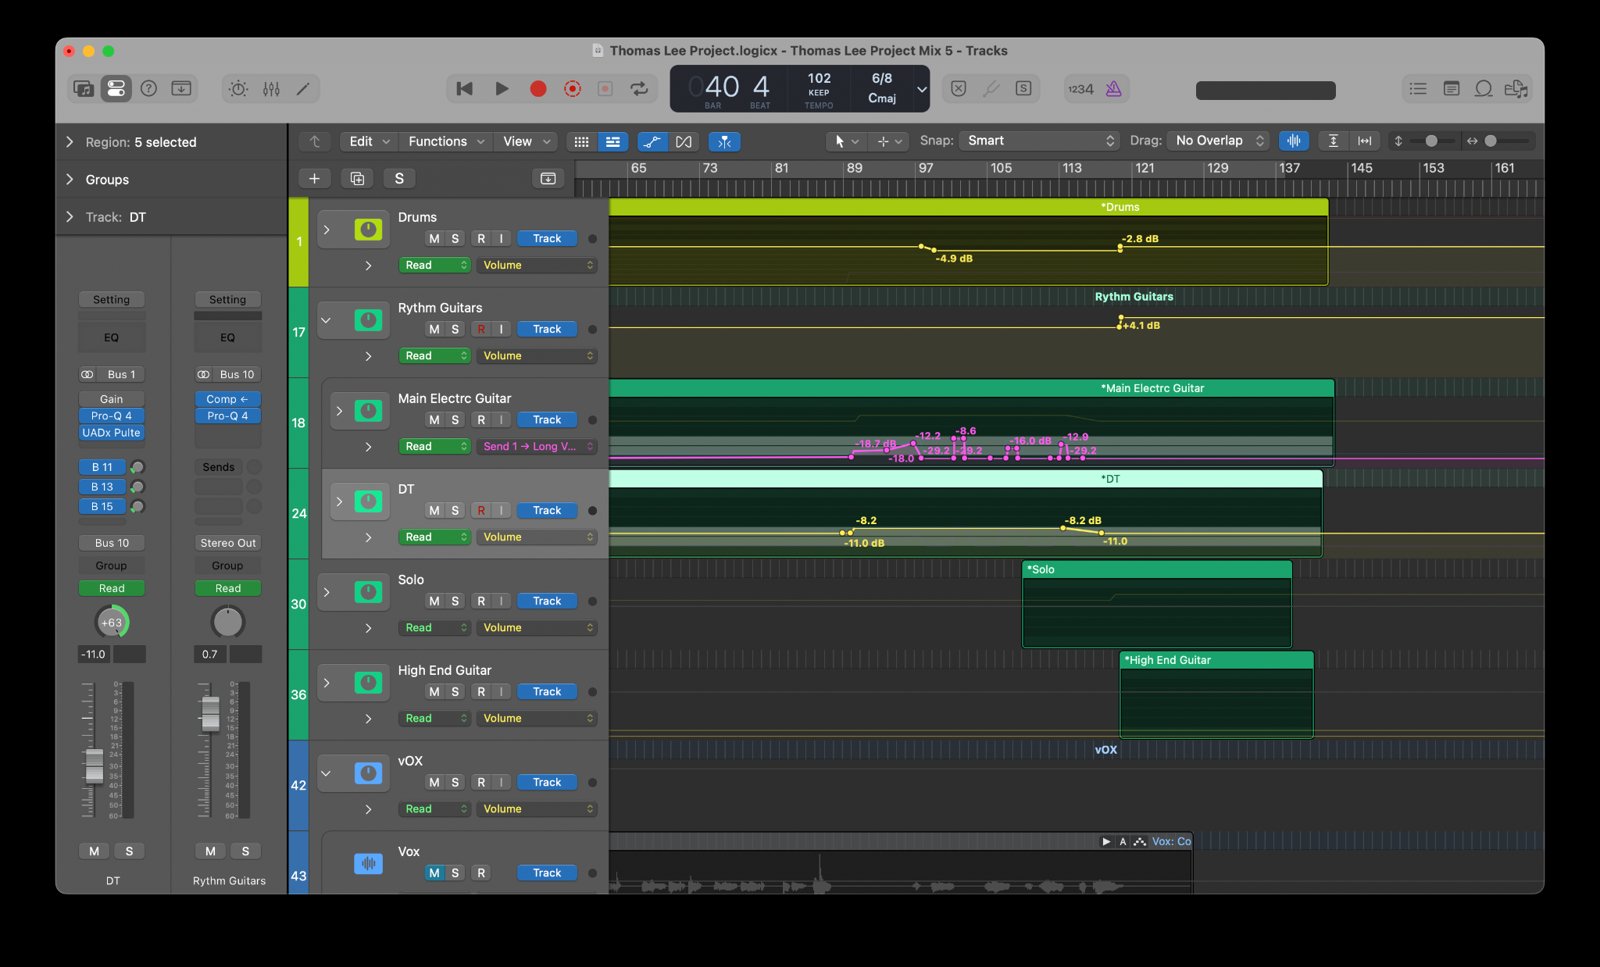
Fig 37: Automation of the Tape Delay aux send
- Aggressive Drum Compression (RVox): To get the drums to punch through the dense low-mid arrangement, I compressed the drum bus using Waves RVox. While traditionally a vocal compressor, RVox applies a highly aggressive, forward-sounding compression and introduces a great gating effect that makes drum rooms sound explosive (Dirty Sounds Clean, 2024).
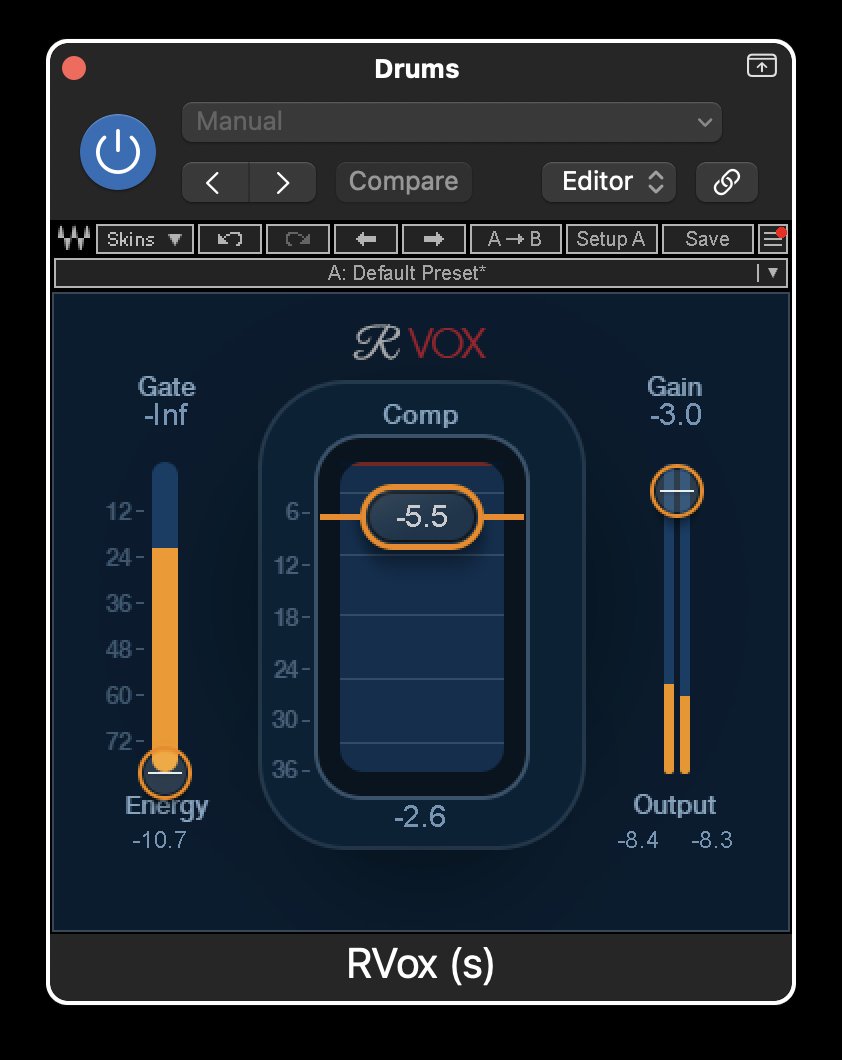
Fig 38: Aggressive compression on the drum bus using Waves RVox
Ema Slany - Thunder
- Snare Healing over Replacement: I originally wanted to trigger a different snare sample using the Waves InTrigger plugin because I wasn't entirely happy with the snare tone (Hanson, 2026). However, the trigger introduced massive phase issues with the overheads. I abandoned the replacement idea and instead used compression and EQ to shape the original snare audio, which ultimately worked beautifully.
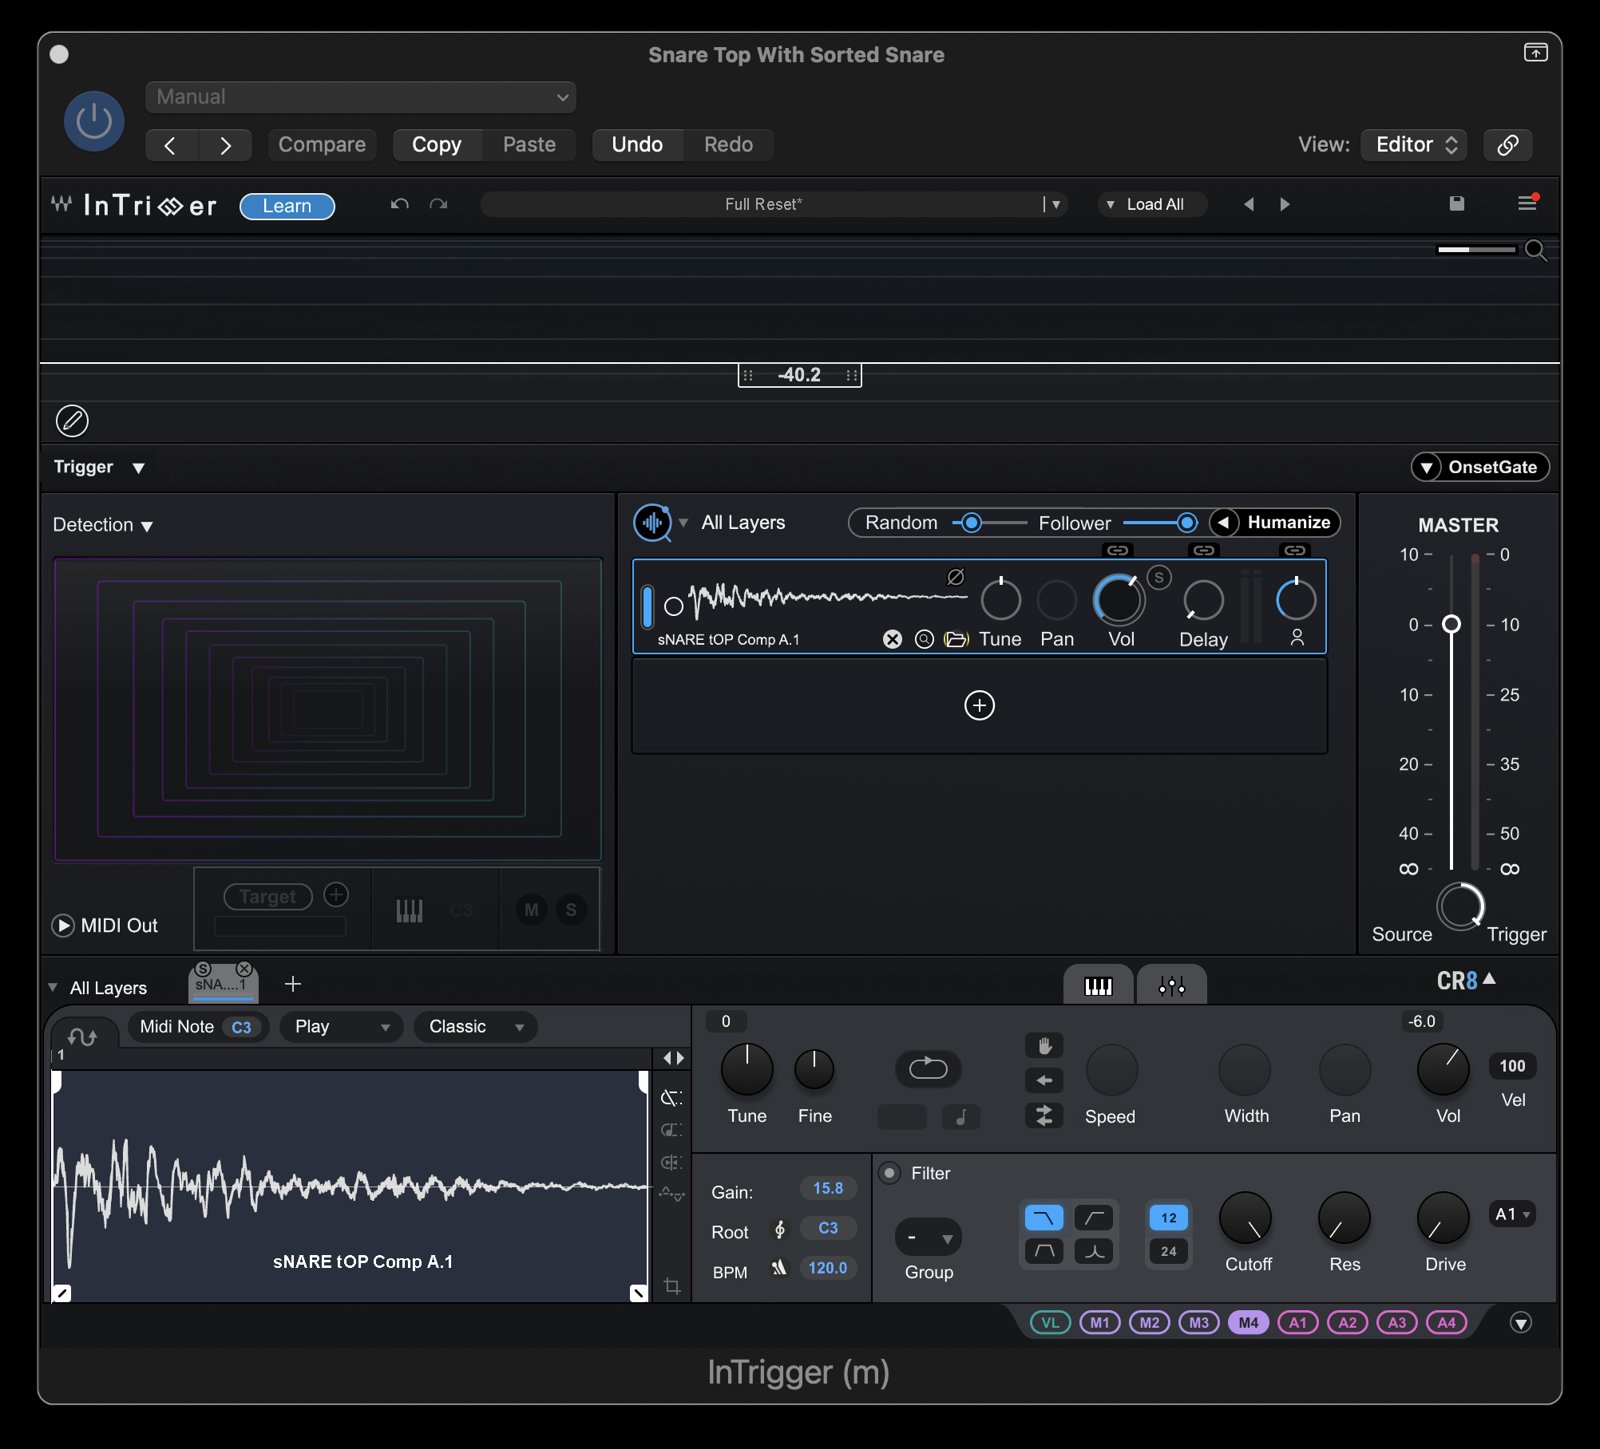
Fig 39: Waves In-Trigger Interface
- Synthesizing Sub-Bass: Thunder carries a lot of emotional weight, which needed to be anchored by deep low-end. The recorded bass guitar was great, but it lacked sub-frequencies. Using the same trick from Brown Suit, I converted the bass guitar audio to MIDI via Flex Pitch. I sent that MIDI to Logic’s Retro Synth, applied a steep low-pass filter, and blended this synthesized sub-bass perfectly underneath the live bass guitar for massive depth.

Fig 40: Synthesized sub-bass generated via Logic's Retro Synth
- Matching Searows' "Dirt": I loved the acoustic guitar tone on the song "Dirt" by Searows and wanted that exact vibe for Emma's acoustic. I used Logic's Match EQ to analyze the Searows track and applied that curve to our acoustic guitars, yielding a fantastic result (Pro Mix Academy, 2023).
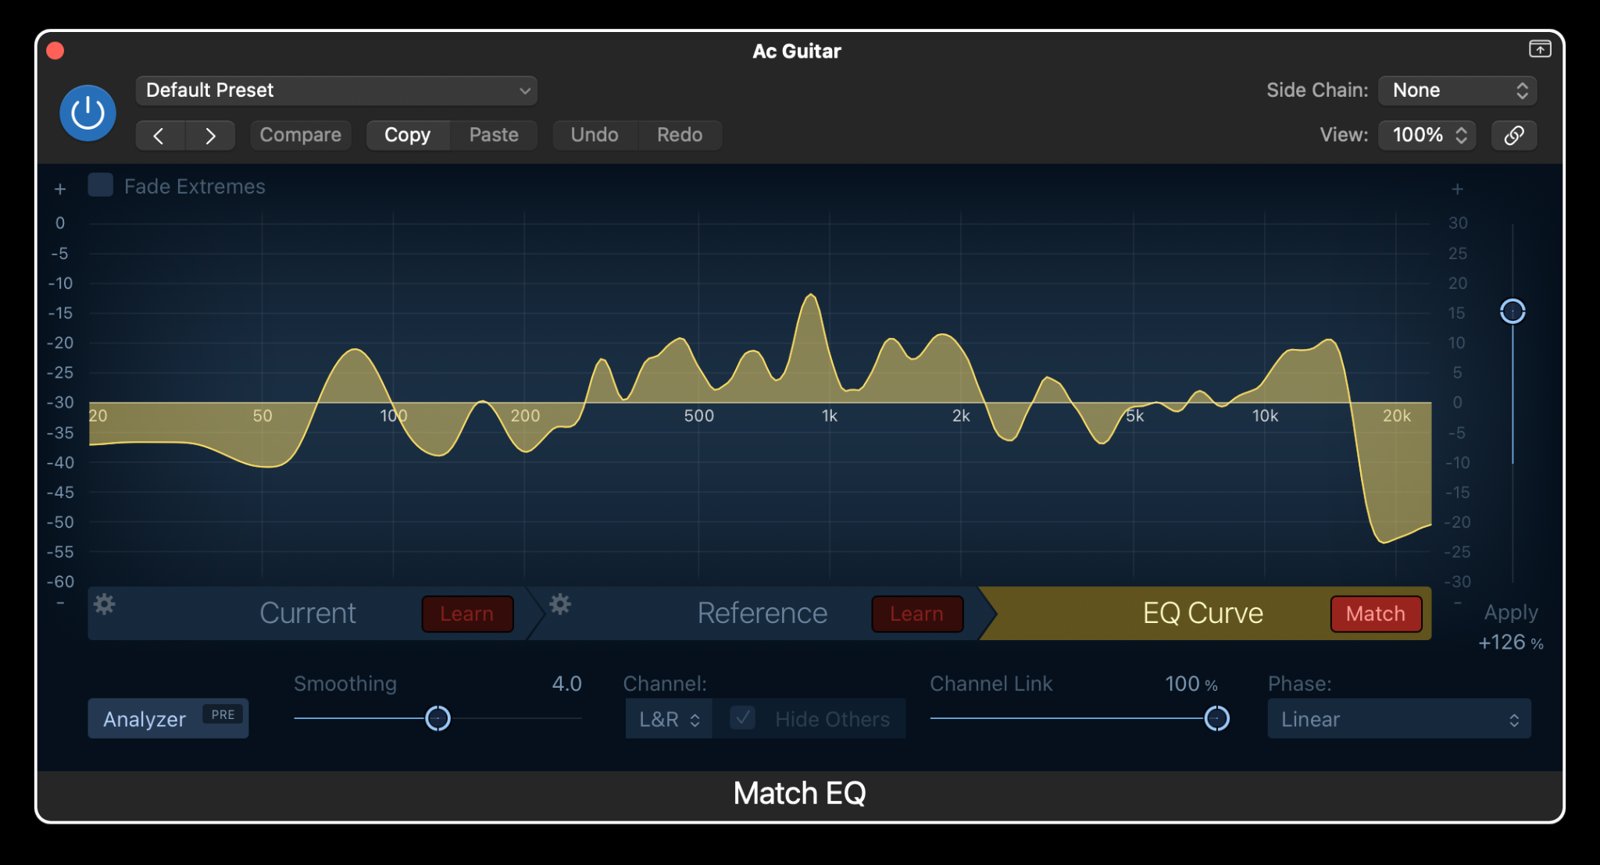
Fig 41: Logic's Match EQ applying the Searows acoustic guitar curve
- Vibing up the Keys: We tracked a very clean electric piano/synth part. To give it character and make it fit the aesthetic of the track, I processed it through the RC-20 Retro Color plugin, adding vinyl noise, saturation, and harmonic distortion (Pageau, 2023).
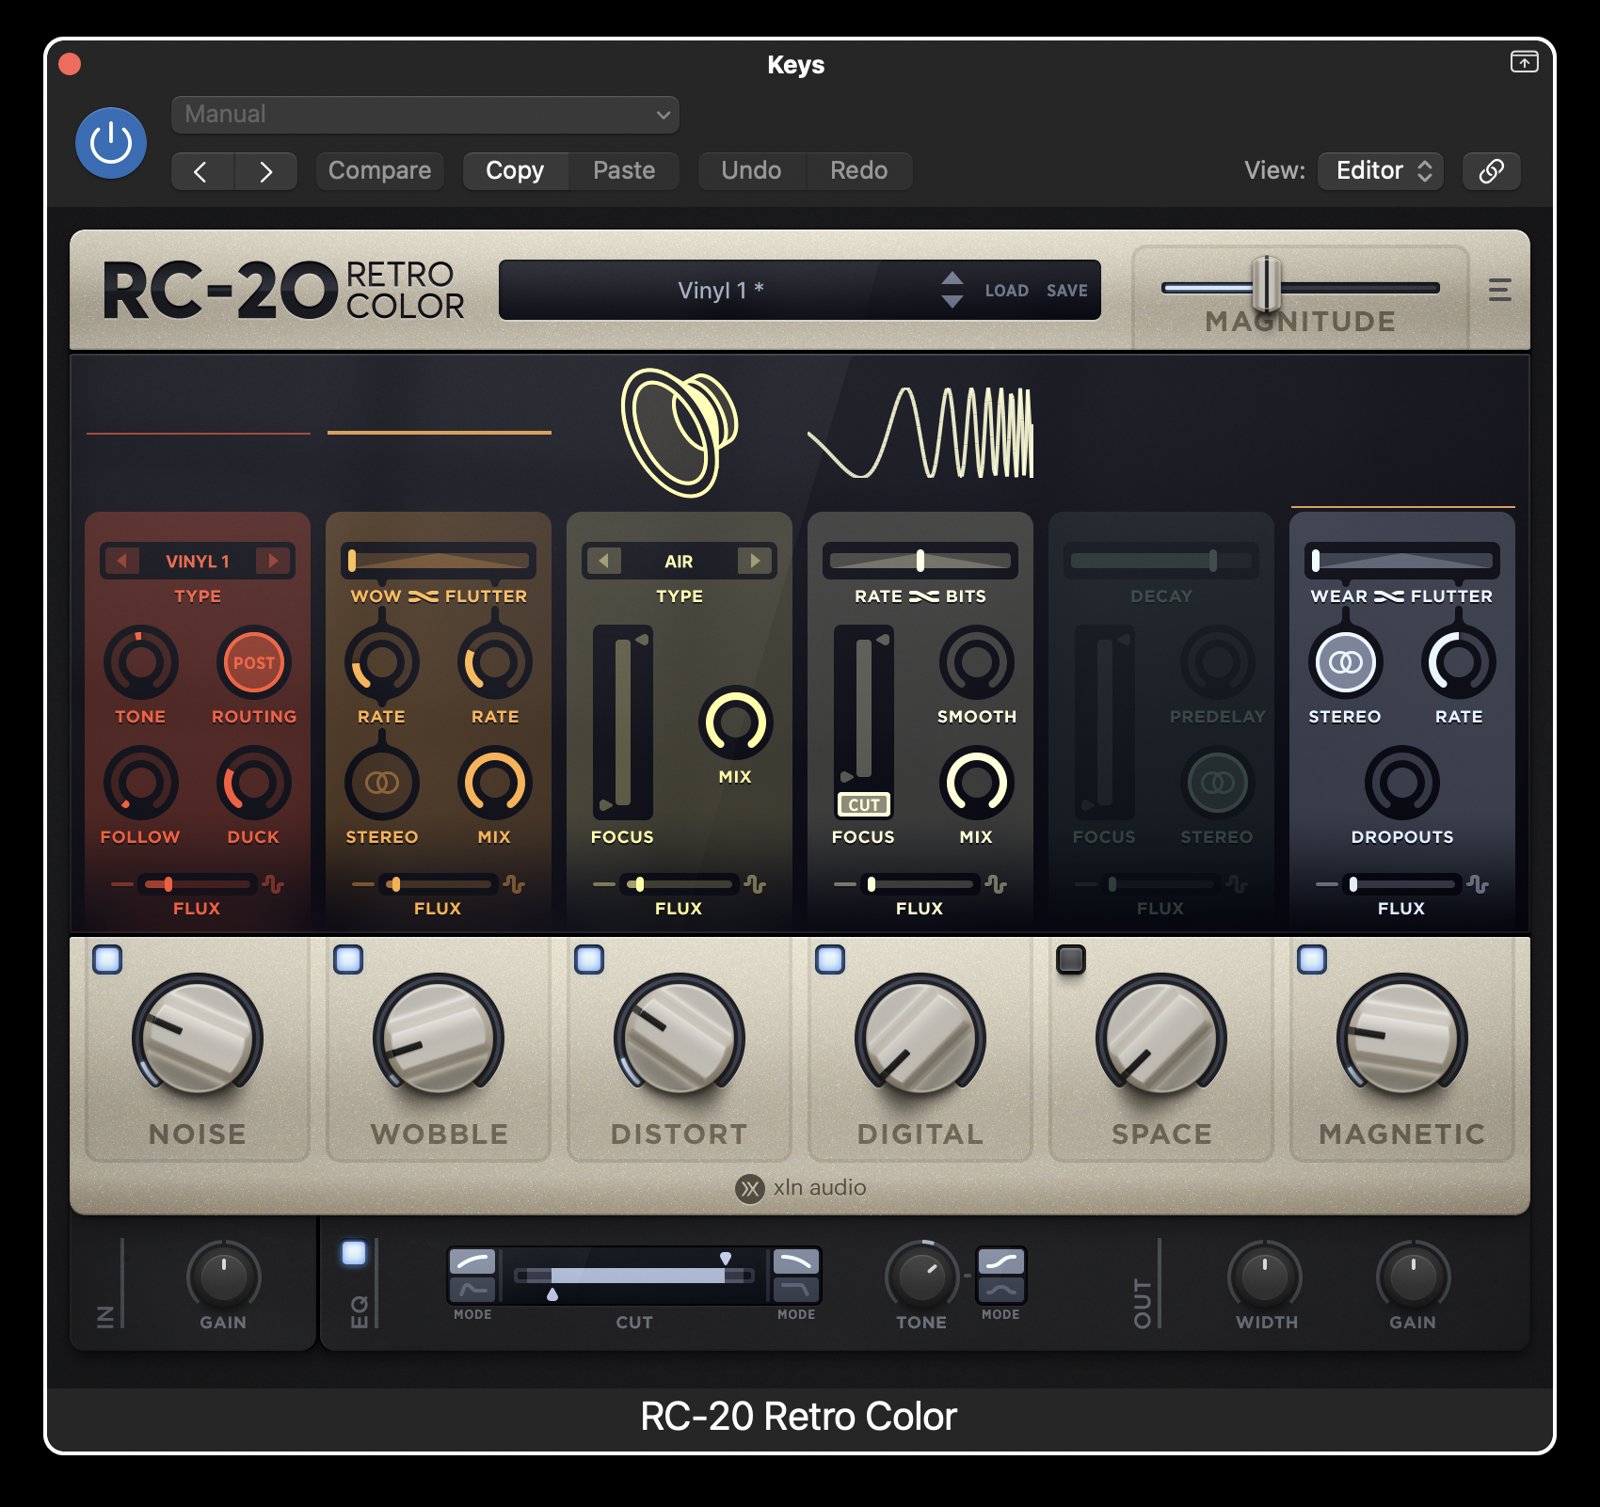
Fig 42: RC-20 Retro Color plugin processing the electric piano track
Samba - Face It
- Less is More: This track was all about restraint. I utilized very minimal processing, relying entirely on the foundational techniques mentioned earlier (good gain staging, slight EQ, and standard compression). The only notable creative addition was utilizing the Chorus aux track trick on the guitars to add a lush, wide shimmer to the arrangement.
References
Apple Inc. (no date) 'Create MIDI from audio using Flex Pitch in Logic Pro for Mac', Apple Support. Available at: https://support.apple.com/en-gb/guide/logicpro/lgcpe2fd1b83/mac (Accessed: 15 August 2026).
Audient (no date) 'How to manage low, mid and high frequencies in the mix', Audient. Available at: https://audient.com/tutorial/how-to-manage-low-mid-and-high-frequencies-in-the-mix/ (Accessed: 15 August 2026).
Avid (2024) 'How to mix drums: a step-by-step guide', Avid, 19 September. Available at: https://www.avid.com/resource-center/mixing-drums (Accessed: 15 August 2026).
Ball, A. (2018) My Big Fat Guide to using a Virtual Orchestra. YouTube, 24 May. Available at: https://www.youtube.com/watch?v=wXgqiNtCfUg (Accessed: 15 August 2026).
Bigwood, R. (2011) 'Using aux sends & returns', Sound on Sound, February. Available at: https://www.soundonsound.com/techniques/using-aux-sends-returns (Accessed: 15 August 2026).
Dirty Sounds Clean (2024) 'I never thought using RVOX on drums could be this effective' [Instagram Reel]. Instagram, October. Available at: https://www.instagram.com/reels/DBHHDzJRGIM/ (Accessed: 15 August 2026).
Hanson, R. (2026) 'Waves InTrigger drum replacer plug-in – a Mix real-world review', Mix, 26 February. Available at: https://www.mixonline.com/technology/reviews/plug-ins/waves-intrigger-drum-replacer-plug-in-a-mix-real-world-review (Accessed: 15 August 2026).
Hignell, A. (no date) 'Sidechain compression: 7 tips for better mixes', Mixed In Key. Available at: https://mixedinkey.com/captain-plugins/wiki/sidechain-compression-7-tips-for-better-mixes/ (Accessed: 15 August 2026).
Huff, C. (no date) 'EQ for an acoustic guitar', Behind The Mixer. Available at: https://www.behindthemixer.com/eq-acoustic-guitar/ (Accessed: 14 August 2026).
Johncy, J. (2025) 'How to use automation to create dynamic transitions in your mix', Point Blank Music School, 17 December. Available at: https://www.pointblankmusicschool.com/blog/how-to-use-automation-to-create-dynamic-transitions-in-your-mix/ (Accessed: 15 August 2026).
Martinovich, A. (2022) 'How to remove plosives from a voice recording', iZotope, 5 October. Available at: https://www.izotope.com/community/blog/removing-plosives-from-a-voice-recording?srsltid=AfmBOop-6ZzZuviZgOU6FKwW5AxEZP11WFDLRhP62xu1woruplUKfDUl (Accessed: 15 August 2026).
McAllister, M. (2023) 'How to EQ acoustic guitar in a mix', Produce Like A Pro, 2 April. Available at: https://producelikeapro.com/blog/how-to-eq-acoustic-guitar-in-a-mix/ (Accessed: 14 August 2026).
Moozix (2026) 'Reverb automation during mix: how to control space without drowning details', Moozix, 30 June. Available at: https://moozix.com/blog/reverb-automation-during-mix-how-to-control-space-without-drowning-details-6a43157f254dd (Accessed: 15 August 2026).
Pageau, M. (2023) '5 creative uses for RC-20 by XLN Audio', Internet Tattoo, 4 September. Available at: https://www.internettattoo.com/blog/5-creative-use-for-rc-20-by-xln-audio (Accessed: 15 August 2026).
Pro Mix Academy (2023) 'Logic Pro Match EQ: what is it & how does it work?', Pro Mix Academy, 23 August. Available at: https://promixacademy.com/blog/logic-pro-match-eq-what-is-it-how-does-it-work/ (Accessed: 15 August 2026).
Produce Like A Pro (2022) Automation Tricks To Make Your Chorus Sound Huge. YouTube, 14 March. Available at: https://www.youtube.com/watch?v=VYb2FibLvps (Accessed: 15 August 2026).
Ricard, D. (2024) 'Logic Pro: Sends, buses & auxes', Sound on Sound, June. Available at: https://www.soundonsound.com/techniques/logic-pro-sends-buses-auxes (Accessed: 15 August 2026).
Robjohns, H. (2013) 'Parallel compression', Sound on Sound, February. Available at: https://www.soundonsound.com/techniques/parallel-compression (Accessed: 15 August 2026).
Rogers, N. (2021) 'Saturation strategies', Sound on Sound, May. Available at: https://www.soundonsound.com/techniques/saturation-strategies (Accessed: 15 August 2026).
Sage Audio (no date) 'Sidechaining techniques', Sage Audio. Available at: https://www.sageaudio.com/articles/sidechaining-techniques (Accessed: 15 August 2026).
Samama, B. (2016) 'Tutorial: how to make pitch correction sound natural', Sonicbids, 23 February. Available at: https://blog.sonicbids.com/tutorial-how-to-make-pitch-correction-sound-natural (Accessed: 15 August 2026).
Skidmore, M. (2013) 'Pitch-correcting vocals with Melodyne', Sound on Sound, July. Available at: https://www.soundonsound.com/techniques/pitch-correcting-vocals-melodyne (Accessed: 15 August 2026).
Sonnox (2025) 'Oxford Inflator user guide', Sonnox. Available at: https://dload.sonnoxplugins.com/pub/plugins/UserGuides/Oxford_Inflator_User_Guide.html (Accessed: 15 August 2026).
Sonnox Plugins (2025) The ULTIMATE Oxford Inflator tutorial. YouTube, 22 September. Available at: https://www.youtube.com/watch?v=rDjDdGrk2uU (Accessed: 15 August 2026).
Stewart, I. (2021) 'Mix bus 101: why, when, and how to group tracks into a bus', iZotope, 16 December. Available at: https://www.izotope.com/community/blog/mix-buses-101?srsltid=AfmBOopBp1wF4cQyC0-FUZmL2gjPinh0WT9lU69dDFuxSAB4wwgo3rtT (Accessed: 15 August 2026).
Streaky (2024) Drum Buss Saturation Secret. YouTube, 21 October. Available at: https://youtube.com/shorts/s78DVNsSU0o?si=A5Jq0lY1UqhlWi8l (Accessed: 15 August 2026).
Subphotic (2025) '5 mix automation tips: reverb, delay, and more', Splice, 13 May. Available at: https://splice.com/blog/mix-automation-tips/ (Accessed: 15 August 2026).
Templeton, S. (2020) 'Tips for mixing with slap delay', Waves, 7 May. Available at: https://www.waves.com/tips-for-mixing-with-slap-delay (Accessed: 15 August 2026).
Thornton, M. (2014) 'Aux talk', Sound on Sound, September. Available at: https://www.soundonsound.com/techniques/aux-talk (Accessed: 15 August 2026).
Tignor, C. (2026) 'What is a de-esser (and how do I use it for vocals)?', Splice, 23 April. Available at: https://splice.com/blog/what-is-a-de-esser/#WhatIsDeessing (Accessed: 15 August 2026).
Universal Audio (no date) 'Ampex ATR-102 Master Tape Recorder Manual', Universal Audio Support. Available at: https://help.uaudio.com/hc/en-us/articles/28281608779540-Ampex-ATR-102-Master-Tape-Recorder-Manual (Accessed: 15 August 2026).
Universal Audio (2024) Master Your Mix with the Ampex ATR-102 Tape Plug-In. YouTube, 23 August. Available at: https://www.youtube.com/watch?v=33atVtJTu3M (Accessed: 15 August 2026).
White, P. (2020) 'How to optimise your reverb treatments', Sound on Sound, November. Available at: https://www.soundonsound.com/techniques/how-optimise-your-reverb-treatments (Accessed: 15 August 2026).
White Sea Studio (2025) The ULTIMATE FabFilter Pro-L 2 tutorial!. YouTube, June. Available at: https://www.youtube.com/watch?v=rModnMRN9NY (Accessed: 15 August 2026).